 01-26-2017, 07:37 PM
|
#1
|
Join Date: Jan 2017
Posts: 43
|
My Hawk Customizations
I am a long time reader, first time post. Want to thank all friendly people here in ChinaRiders Forums. I have learned numerous things that I would otherwise not have known.
This is the current configuration of my Hawk. It has been discussed here many times before, so nothing special to talk about it:
Carburetor: Mikuni VM 26
Longer Shift Lever
O-ring chain
Wider mirrors
Owner Manual Canister
Trunk
Shinko 705 Tires:
Front Tire: 90/90-21
Rear Tire: 120/80-18
16/42 sprockets. Note: compare to 17/50, this combination reduces chain wear because of lower linear speed. It also eliminates problems with front sprocket cover installation.
I want to share only the mods not described on this forum or the modes done in different way. By the way, I sell all new parts removed from my Hawk. See my post in the Free Classifieds section.
http://www.chinariders.net/showpost....27&postcount=1
Very inexpensive.
------------------
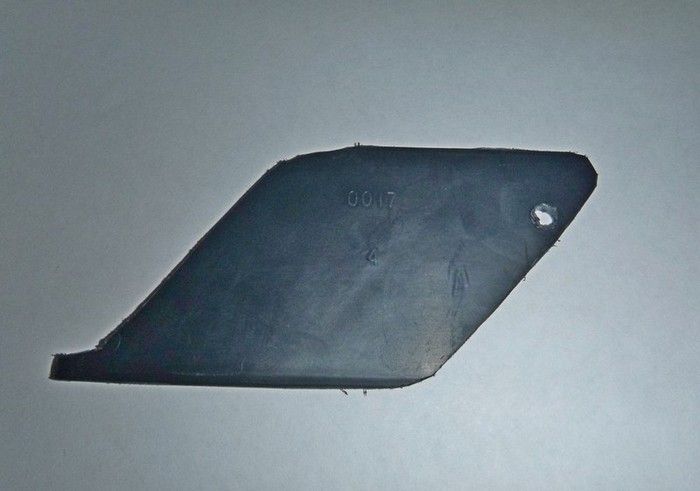
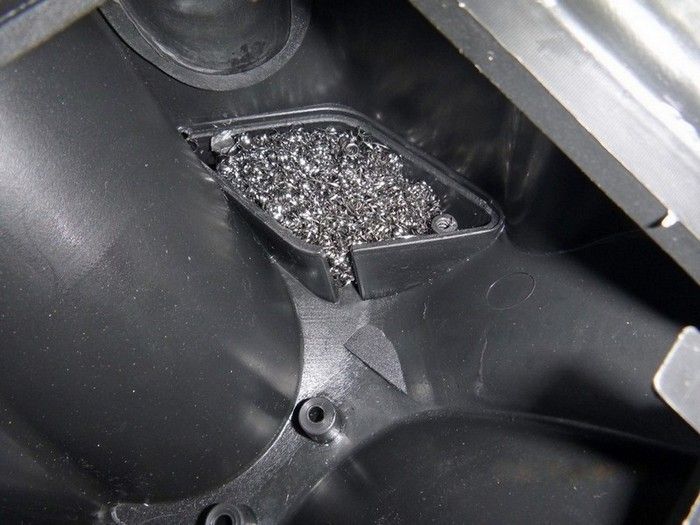
Let's begin with the air filter and a crankcase vent. As appears, it doesn't have proper oil catch breather. That is the reason why many people complain about oiled paper element. It is pretty clear from the pictures how to fix this problem.
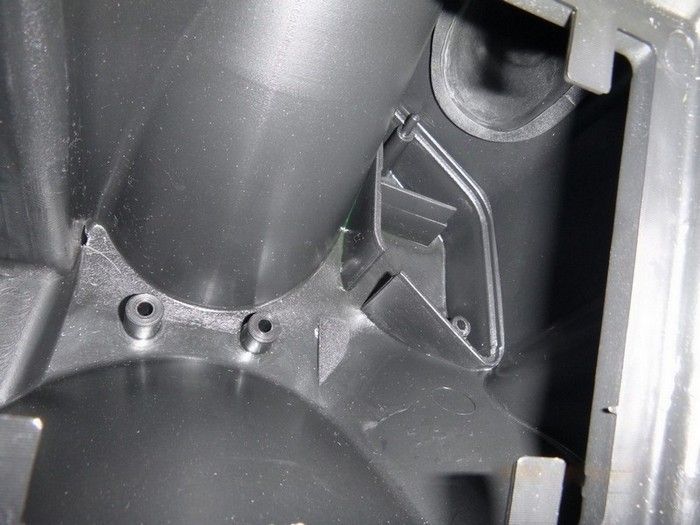
 Made plastic cover.
 Stainless steel dish scrubber used for the filling.
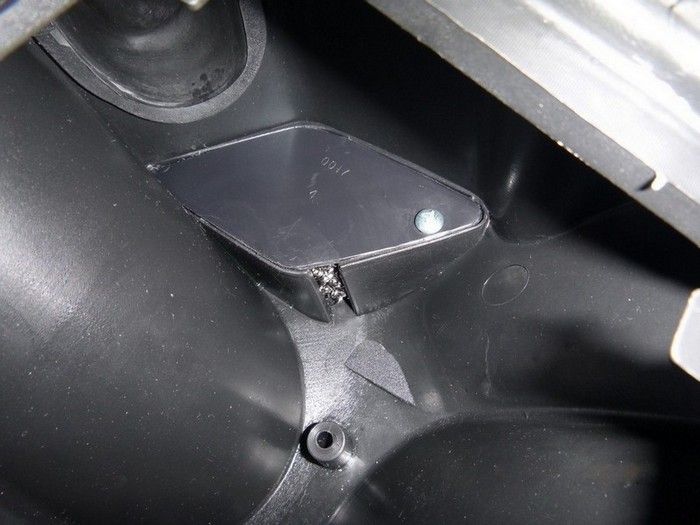 Clean the drainage hole. Remove stock cap from the opposite side of the hole and install the purge tube.
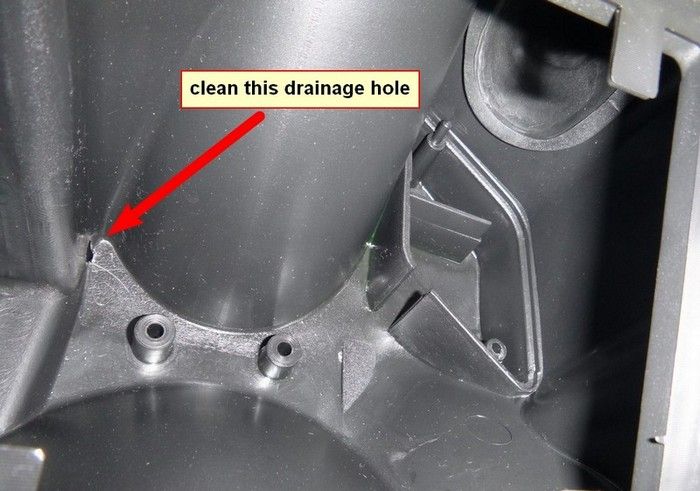 To make the purge tube, hit the end of the silicone tube with a lighter, than quickly grip it with cold pliers (don't press too much). Hold it for 10-15 seconds, cut excess.
When the bike is on the side stand, the oil slow drips from the oil catcher into the purge tube. It should be cleaned periodically.
To make the purge tube, hit the end of the silicone tube with a lighter, than quickly grip it with cold pliers (don't press too much). Hold it for 10-15 seconds, cut excess.
When the bike is on the side stand, the oil slow drips from the oil catcher into the purge tube. It should be cleaned periodically.
 ------------------
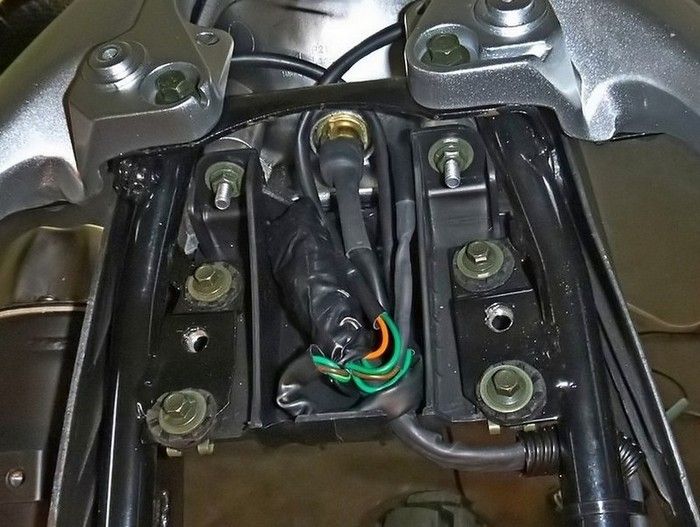
The cable harness under the tank was installed incorrectly from the factory.
------------------
The cable harness under the tank was installed incorrectly from the factory.
 I was unable to move it left. Further investigation reveals that the end of the cable connected to the rear turn light is very short, whereas the license plate light cable has 1 ft. extra length.
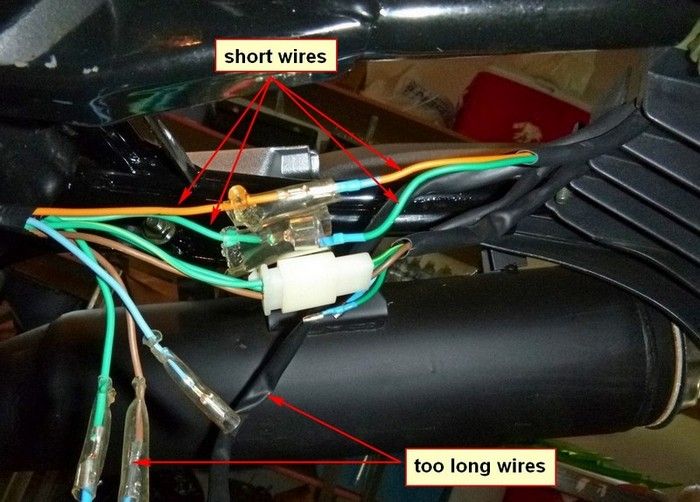 So, the short wires have been extended and the longer ones cut to have entire area more organized. The last 2 ft. of the updated cable harness have been sealed into heat shrink tubing.
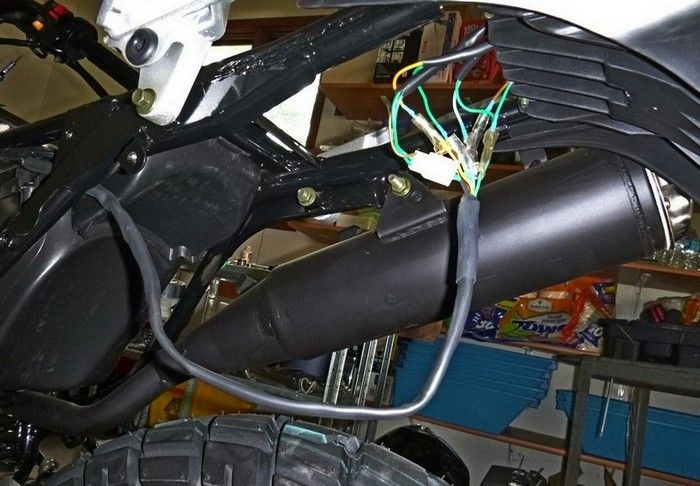 All electrical connectors moved from exposed to dirt area into this small compartment.
 ------------------
The cover of the front sprocket needs some improvement. There are casting burrs on the surface adjoining the engine body, making a gap. The chain lubricant mixed with the dirt throws into the generator area through this gap no matter how tighten the screws are. The fix is easy. Put a large piece of a sandpaper on the flat area and scrub the sprocket cover on it until you have a nice clean surface.
------------------
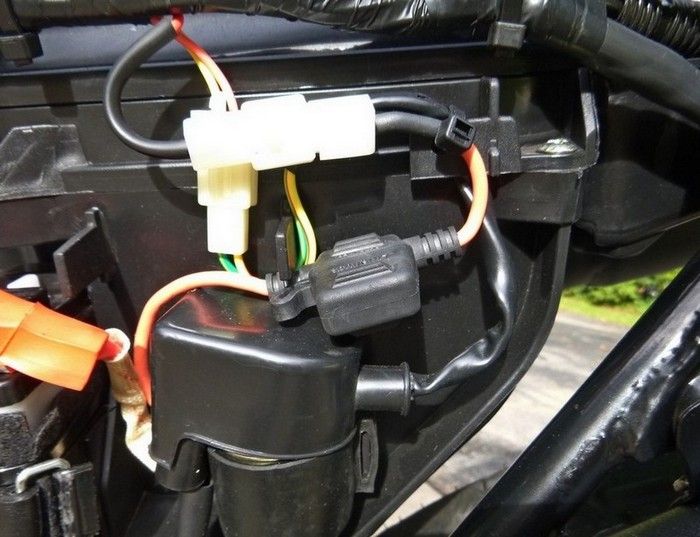
Clumsy and unreliable fuse holder replaced with the car-style water resistant one.
------------------
The cover of the front sprocket needs some improvement. There are casting burrs on the surface adjoining the engine body, making a gap. The chain lubricant mixed with the dirt throws into the generator area through this gap no matter how tighten the screws are. The fix is easy. Put a large piece of a sandpaper on the flat area and scrub the sprocket cover on it until you have a nice clean surface.
------------------
Clumsy and unreliable fuse holder replaced with the car-style water resistant one.
 ------------------
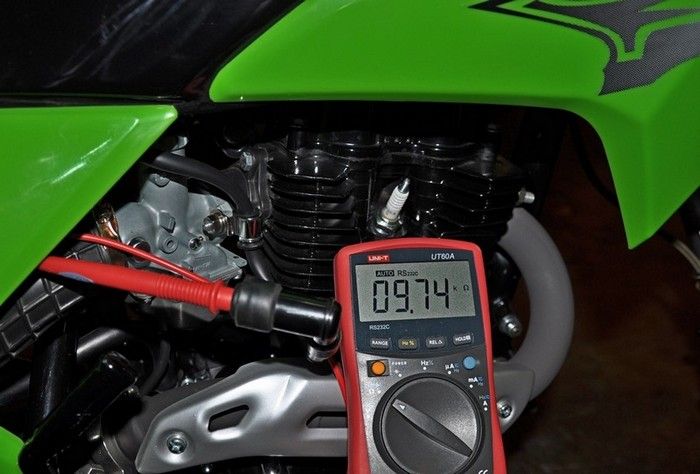
The spark plug. Make sure you have installed the proper one. Common mistake is in the use of dual resistors in the spark plug and in the cap. That causes the voltage on the secondary ignition coil to double above the normal during the discharge and leads to failures. Dual resistors make the spark less "juicy" as well. Here is a simple test to check what type of the spark plug should be installed. Remove the cap from the plug and measure resistance between the cap connector and engine body. If the readings are 7-12 kOhm than the spark should be non-resistor type (NGK DP8EA9 or equivalent).
------------------
The spark plug. Make sure you have installed the proper one. Common mistake is in the use of dual resistors in the spark plug and in the cap. That causes the voltage on the secondary ignition coil to double above the normal during the discharge and leads to failures. Dual resistors make the spark less "juicy" as well. Here is a simple test to check what type of the spark plug should be installed. Remove the cap from the plug and measure resistance between the cap connector and engine body. If the readings are 7-12 kOhm than the spark should be non-resistor type (NGK DP8EA9 or equivalent).
 ------------------
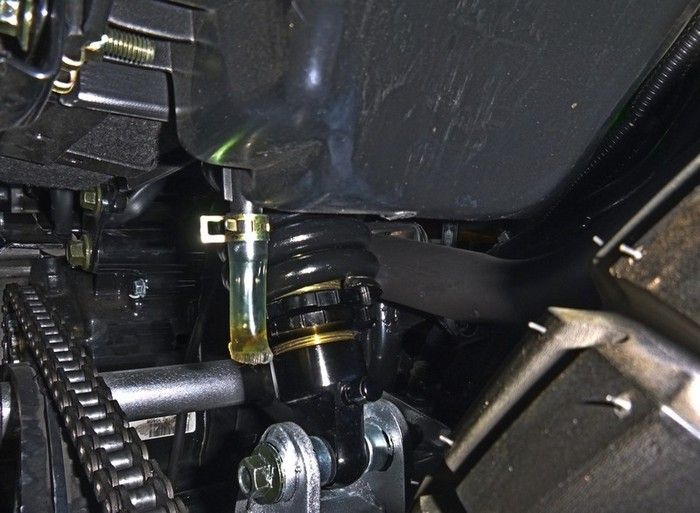
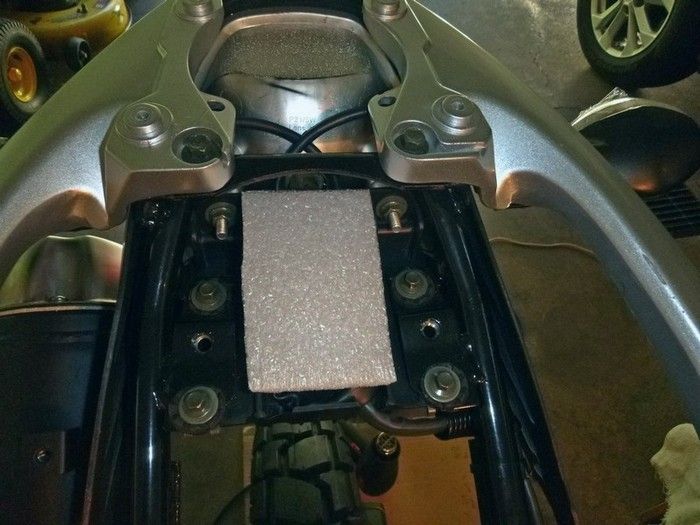
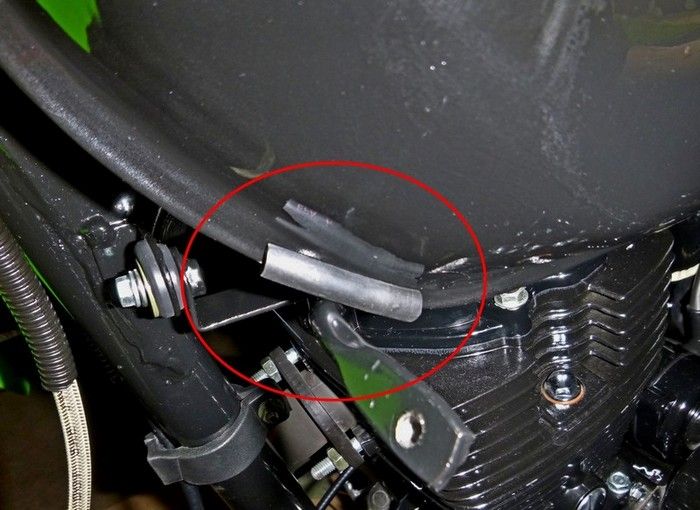
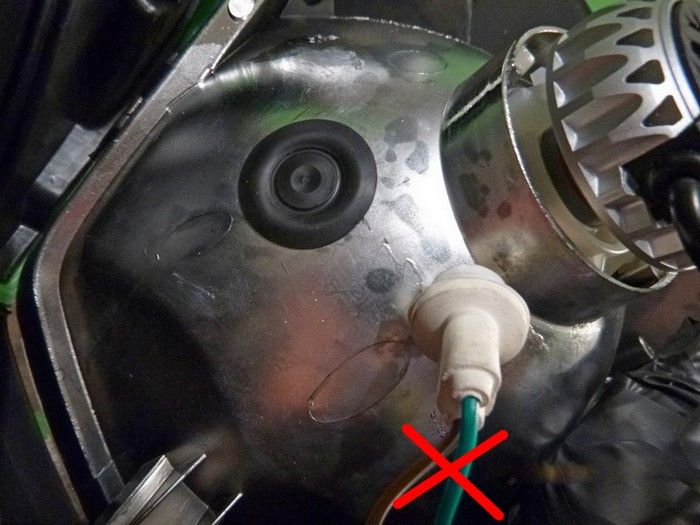
Additional vibration/noise isolation has been added to the tank area.
At the place shown on the following picture the tank was simply laying on the frame touching it with its welded joint, because the original rubber mount is too thin. There is a good chance that the welding on the tank would be damaged within the time due to the rubbing vibration of the metal to metal at the touch point. That could cause a gas leaks, not to mention that the tank body works as a noise acoustic resonator. It was fixed by installing 1/4 inch thick rubber insertion as shown.
------------------
Additional vibration/noise isolation has been added to the tank area.
At the place shown on the following picture the tank was simply laying on the frame touching it with its welded joint, because the original rubber mount is too thin. There is a good chance that the welding on the tank would be damaged within the time due to the rubbing vibration of the metal to metal at the touch point. That could cause a gas leaks, not to mention that the tank body works as a noise acoustic resonator. It was fixed by installing 1/4 inch thick rubber insertion as shown.
 Rubber tube inserts on both sides:
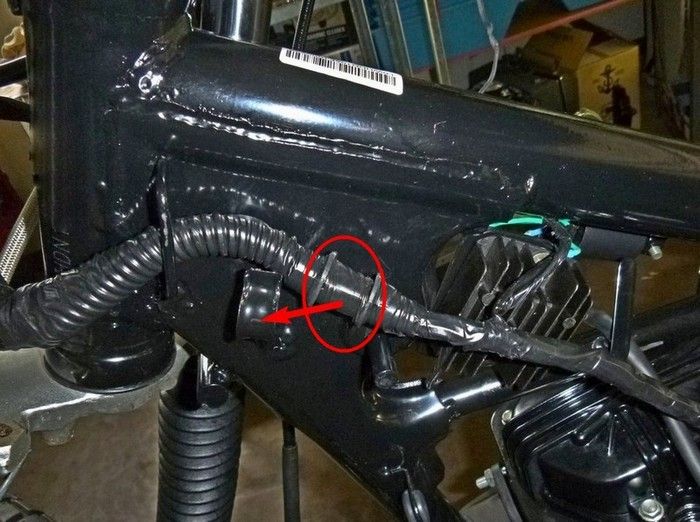
 Cover bracket installation changed.
 ------------------
Rerouted clutch cable to the left side of the steering head as shown. That significantly reduce friction inside the cable. Note installed cable protection.
------------------
Rerouted clutch cable to the left side of the steering head as shown. That significantly reduce friction inside the cable. Note installed cable protection.
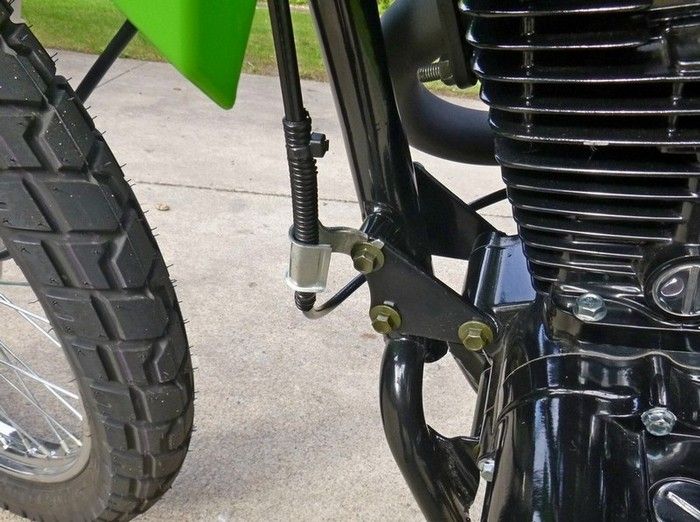 ------------------
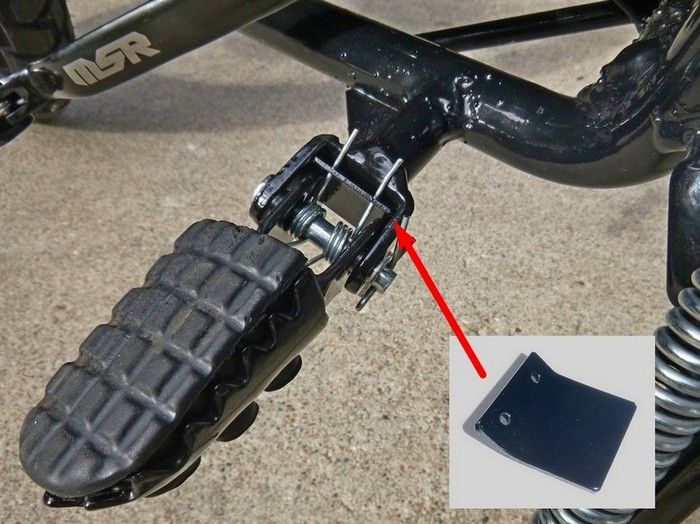
Made this steel inserts to fix outward slope of the pegs. It prevents feet slide off the pegs.
------------------
Made this steel inserts to fix outward slope of the pegs. It prevents feet slide off the pegs.
 ------------------
The incandescent headlamp replaced with LED identical to one from CSC. They sell it for $69.95+SH. Here is a better deal: two for $58.98+ free SH - https://www.amazon.com/Yudely-Headli...4+Fanless+9003
------------------
The incandescent headlamp replaced with LED identical to one from CSC. They sell it for $69.95+SH. Here is a better deal: two for $58.98+ free SH - https://www.amazon.com/Yudely-Headli...4+Fanless+9003
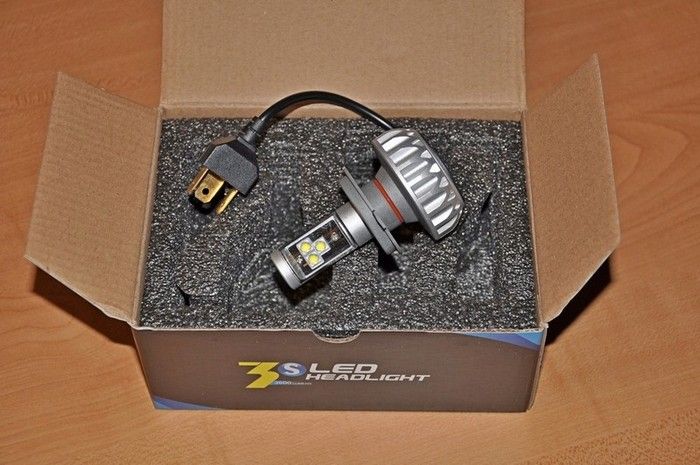 It is very good LED bulb with L/H beam = 2000/3000 lm and additional installable filters for the desired light temp. There is one cavity however. It is a fanless, and it overheats. As measured with infrared thermometer, the temperatures of the improperly designed heatsink rises up to +90-95 degC in summer days. It means that the temp. of the LED chips are well above +120-130 degC. Not sure for how long they would serve under such a stress. If you consider headlamp LED replacement, I'd certainly recommend taking LED bulb with fan.
------------------
Useless position light has been removed and the wires cut.
It is very good LED bulb with L/H beam = 2000/3000 lm and additional installable filters for the desired light temp. There is one cavity however. It is a fanless, and it overheats. As measured with infrared thermometer, the temperatures of the improperly designed heatsink rises up to +90-95 degC in summer days. It means that the temp. of the LED chips are well above +120-130 degC. Not sure for how long they would serve under such a stress. If you consider headlamp LED replacement, I'd certainly recommend taking LED bulb with fan.
------------------
Useless position light has been removed and the wires cut.
 ------------------
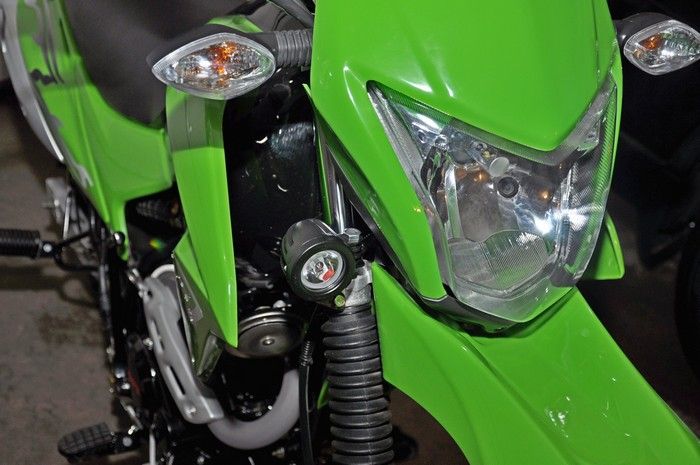
Installed additional 800 lm LED to light up right edge of the road. It draws just 0.6A. $12.96, free SH -
http://www.ebay.com/itm/191981841360?_trksid=p2060353.m2749.l2649&ssPageNa me=STRK%3AMEBIDX%3AIT
------------------
Installed additional 800 lm LED to light up right edge of the road. It draws just 0.6A. $12.96, free SH -
http://www.ebay.com/itm/191981841360?_trksid=p2060353.m2749.l2649&ssPageNa me=STRK%3AMEBIDX%3AIT
 ------------------
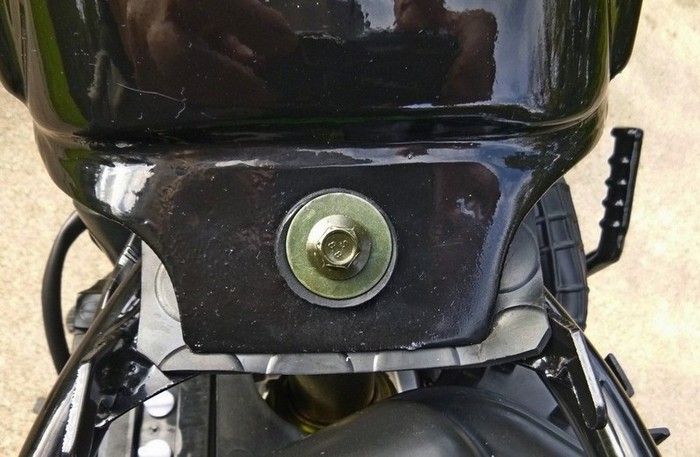
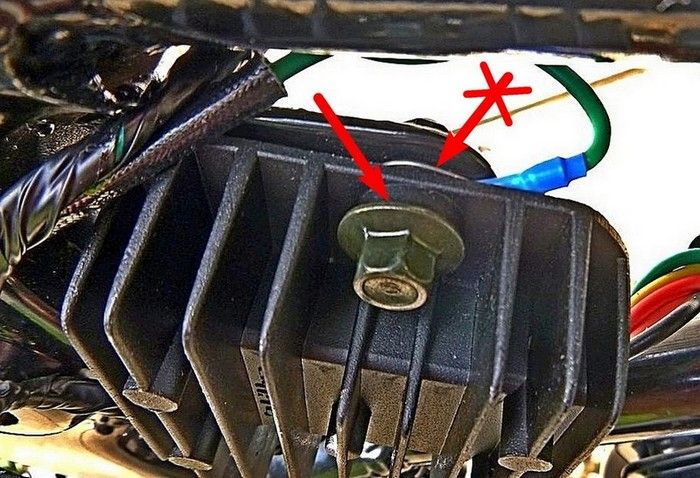
The electrical ground wire terminal improperly installed between two painted surfaces (bad electrical contact). It must be moved under the bolt head shown and installed with a spring lock washer.
------------------
The electrical ground wire terminal improperly installed between two painted surfaces (bad electrical contact). It must be moved under the bolt head shown and installed with a spring lock washer.
 ------------------
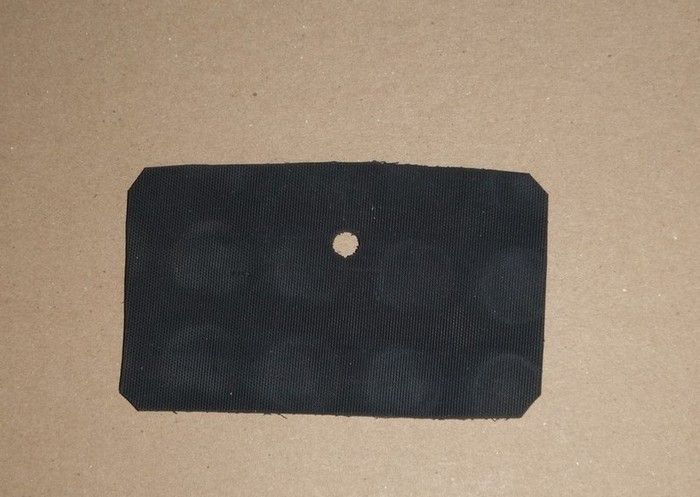
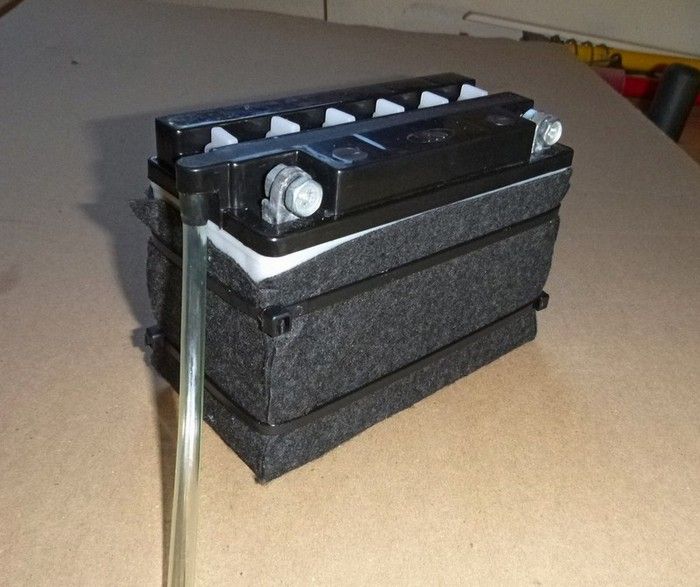
Installed electrolyte absorbing belt on the battery to protect from possible spills. I will replace stock battery with the sealed one anyway.
------------------
Installed electrolyte absorbing belt on the battery to protect from possible spills. I will replace stock battery with the sealed one anyway.
 ------------------
The steering head bearings must be greased. There was not even a trace of the grease whatsoever when I open it.
As you now, the swingarm on the Hawk-250 is not needle bearinged. It is bushed and requires a lot of grease. After greasing the steering head bearings, it wasn't a big surprise for me to discover dead dry swingarm bushings. So, clean all the parts with a gas-damped cloth and apply grease generously. Do the same on the following parts which also were dry and dirt from the factory:
shock pivot points
clutch lever pivot
front brake lever pivot
rear brake pedal pivot
------------------
The shock has been replaced with a shorter one (because I plan to rise the seat).
KLX-110 DRZ
http://www.ebay.com/itm/11-KLX-110-DRZ-Rear-Shock-KLX110-DRZ110-Pit-Bike-280mm-1200lbs-/131804524606?hash=item1eb029703e:g:oh8AAOSw~oFXLEI b&vxp=mtr
The upper point requires four washers to be installed:
------------------
The steering head bearings must be greased. There was not even a trace of the grease whatsoever when I open it.
As you now, the swingarm on the Hawk-250 is not needle bearinged. It is bushed and requires a lot of grease. After greasing the steering head bearings, it wasn't a big surprise for me to discover dead dry swingarm bushings. So, clean all the parts with a gas-damped cloth and apply grease generously. Do the same on the following parts which also were dry and dirt from the factory:
shock pivot points
clutch lever pivot
front brake lever pivot
rear brake pedal pivot
------------------
The shock has been replaced with a shorter one (because I plan to rise the seat).
KLX-110 DRZ
http://www.ebay.com/itm/11-KLX-110-DRZ-Rear-Shock-KLX110-DRZ110-Pit-Bike-280mm-1200lbs-/131804524606?hash=item1eb029703e:g:oh8AAOSw~oFXLEI b&vxp=mtr
The upper point requires four washers to be installed:
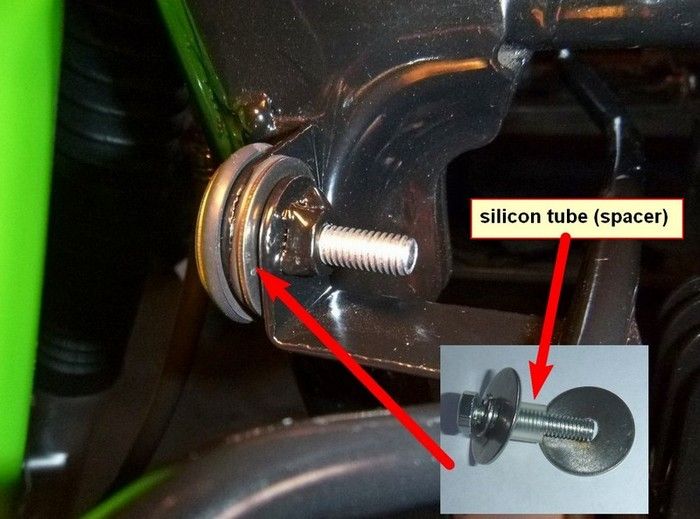
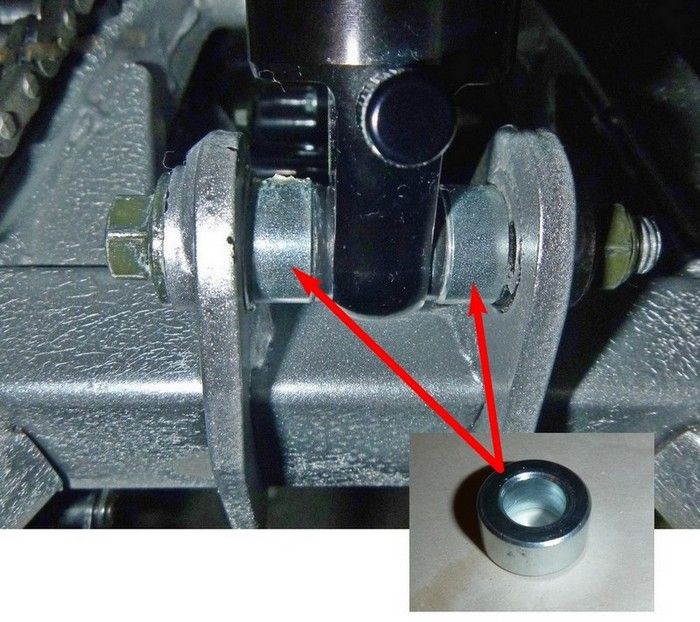
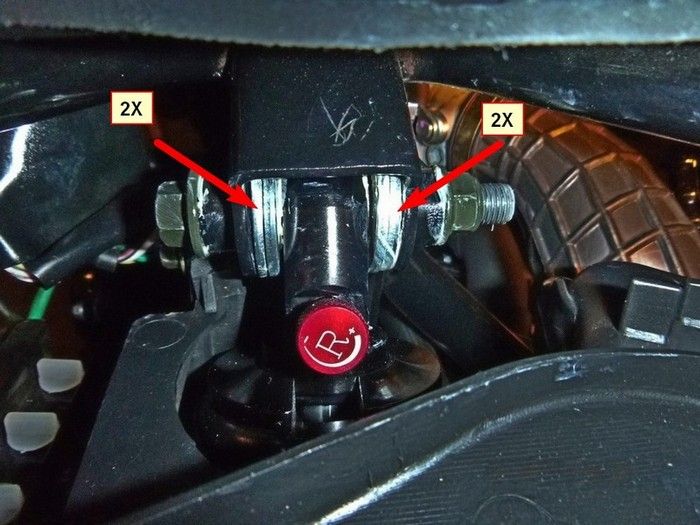 And the lower point requires two additional spacers (all purchased at ACE):
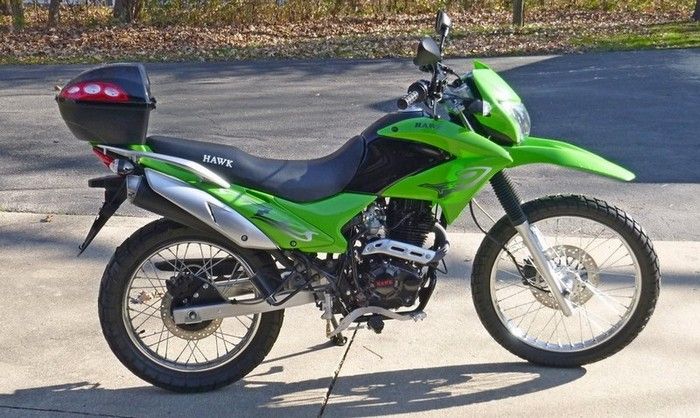
 The swingarm, the rear brake pedal, and the muffler insulator have been silver -repainted. High temp ceramic paint used for the muffler insulator. This is how the bike looks with shorter shock.
|
|
|

|