 04-16-2017, 03:33 PM
|
#1 |

Join Date: Apr 2017
Location: Boston area
Posts: 171
|
Vader headlight conversion
So I've been seeing these really nice LED light bar headlight conversions for the Honda Grom and I thought we should be able to do the same for the Vader. I notice these light bars normally sell for $27 on ebay, not sure why the kits are selling for $260+ on the various sites.
 So I took apart my head light and set out to try and replicate the conversion. I happened to have some of these lying around that I took off from my car: http://www.ebay.com/itm/2x-7INCH-36W...JYuOZi&vxp=mtr  What is interesting is that the existing holes on the sides of the headlight frame is spaced at a good distance to install the LED light bars. I ended up getting M6-1 x 100mm bolts online to secure the lights. This is the threaded hole on the brackets that came with my lights. And they happen to be the same thread of the existing holes in the headlight frame. Here is how I secured the lights:    I wired it up to see how it looked and it was very bright and focused. The lower one I am using for normal lighting. I wired that to the LED light switch on the throttle side. The upper one I wired to the low beam on the light switch on the left side. So that way I get the option to turn either one or both on.    Due to the load issue on the Vader, I will probably not ever use both at the same time. Each of these light bars are 36W total. I also ended up using cable ties to further the secure the bars from shifting around. What's nice is that it is fairly easy to adjust the angle of the lights. Next, I wanted to install side plates. So i picked up a Lexan plate from Home depot for $4.50. I used the side frames of the existing headlight to make a stencil for the sides.   I used a jigsaw with a blade made for plexiglass to easily cut the Lexan. I may replace them with a thicker material in the future if I decide I want to mount the top light more flushed with the lower light, similar to the conversion kit shown above. Next, I had to cut down this extrusion on the inside of the frame.   Here is what it looks like wired up and installed.   Total cost would be less than $40. I may look into moving the top light out so that it is flushed with the lower one, but for now, it works really well and really lights up the road. I am not sure how this wattage draw compares to the original bulb, but I will probably not use the the lights during the daytime and probably just install some flashers. I did notice that I had one extra yellow wire that was left over when everything was wired up. I am not sure what that wire is for. Anybody know?  On a different note, I am seeing that the backlight on my display is pulsating to the revolutions of the engine. At low revs, its very noticeable but as I increase the revolutions, it goes away. This is even with the lights turned off. I noticed this as I was parking the bike and it was idling. This was not the case before the mod. I am thinking something is not grounded right. Also, did you guys notice there is a harness under the seat that is not hooked up to anything? What do you think that is used for? 
|

|
|
04-16-2017, 08:26 PM
|
#2 |

Join Date: Feb 2016
Location: George West, Texas
Posts: 4,097
|
You may want to divert when you see a cop on the street with those on. Just saying
Looks really cool.
__________________
***************************************** 2015 Bashan"Blaze" BS250GY-31 (DB-07K-250) GONE 2017 Suzuki V Strom 650 XT "We are all born ignorant, but one must work hard to remain stupid." ~Benjamin Franklin~
|
|
|
|
04-16-2017, 10:33 PM
|
#4 |

Join Date: May 2015
Location: Houston area
Posts: 1,902
|
Those light bars look really kool.
__________________
"Its not WHAT you ride; its THAT you ride" |
|
|
|
04-17-2017, 06:45 PM
|
#5 | |
|
Join Date: Apr 2017
Location: Boston area
Posts: 171
|
So I figured out the yellow wire is just the high setting for the LED switch on the right side and the display flickering was because my ground wire on my battery was loose. All is good!
But I still do not know what that unused harness is under the seat. Quote:
|
|
|
|
|
04-23-2017, 09:55 PM
|
#6 |
|
Join Date: Apr 2017
Location: Boston area
Posts: 171
|
So I updated the headlight conversion. I had a couple mending plates left over from my EGR removal so I extended out the top light so that it is further forward and it looks much better.
I also reduced the glare from the LEDs for the low beam by installing some electrical tape on the top and bottoms of the reflectors. Now the light is much more focused and the peripheral glare has been eliminated. Eventually, I will use painting tape and maybe black nail polish (or acrylic paint) to replace the electrical tape. It still produces a super bright beam that really lights up the road, which is what you want. I left the high beam as it is to get the full effect of the light when I need it. 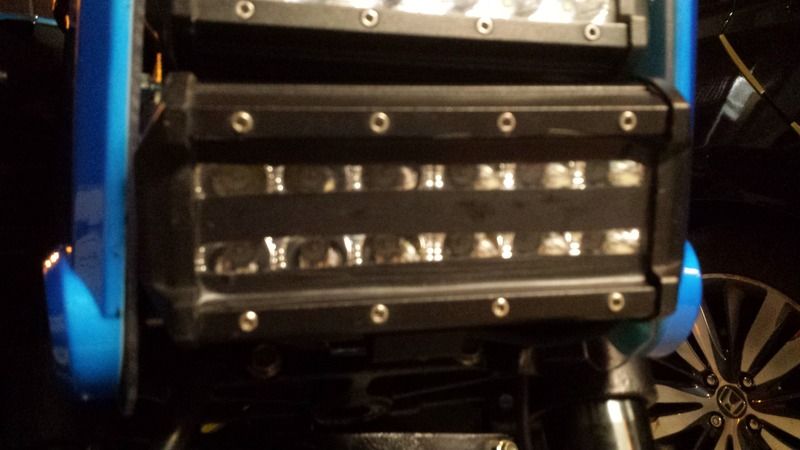 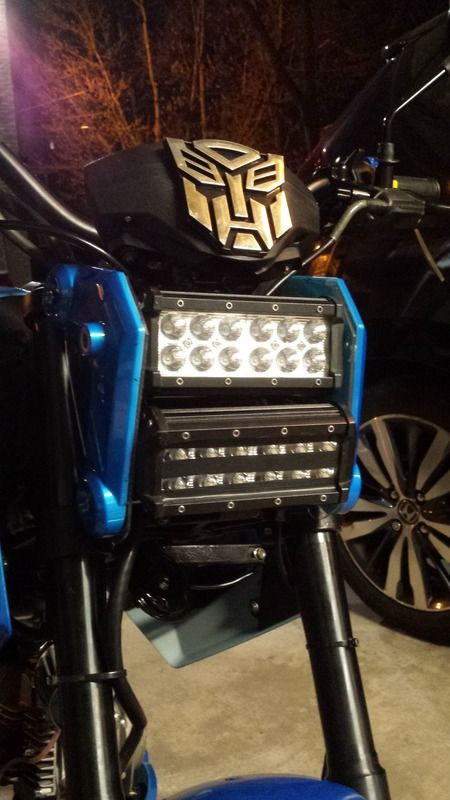 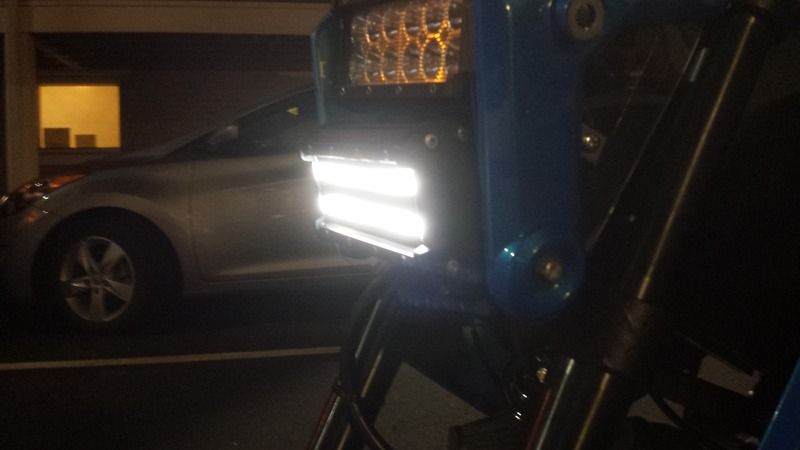 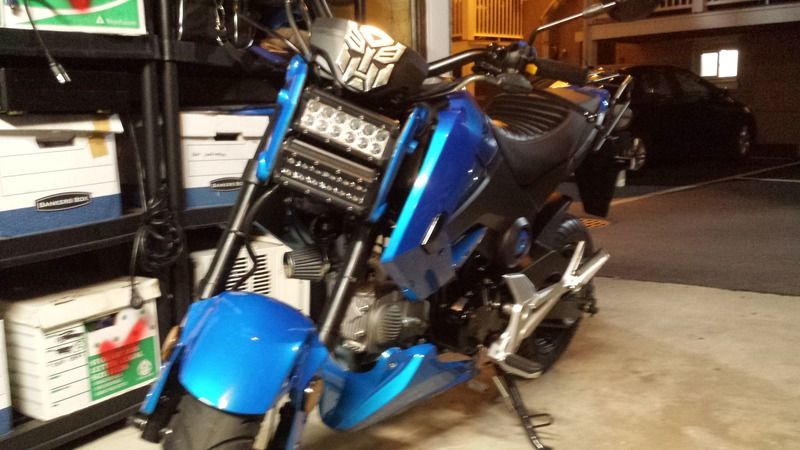
Last edited by prismways; 04-25-2017 at 11:50 PM. |
|
|
|
04-24-2017, 09:43 AM
|
#7 | |

Join Date: Feb 2017
Posts: 418
|
Quote:
__________________
2002 Harley Davidson XL883R 2012 Yamaha FZ6 2022 Hawk 250 2002 Yamaha R6 *sold* Vader 125cc *sold after owning for many years* 1997 Jeep Wrangler *sold due to frame rot* |
|
|
|
|
05-01-2017, 11:11 AM
|
#8 |
|
Join Date: Apr 2017
Location: Boston area
Posts: 171
|
I updated my head light mod. Bought ABS plates off of ebay and made new side plates. I also bought new lights that had the bolt holes in the sides.
I also installed some COB LEDS under the bike to make it more visible at night. Anything to make it easier for others so they don't run into you! 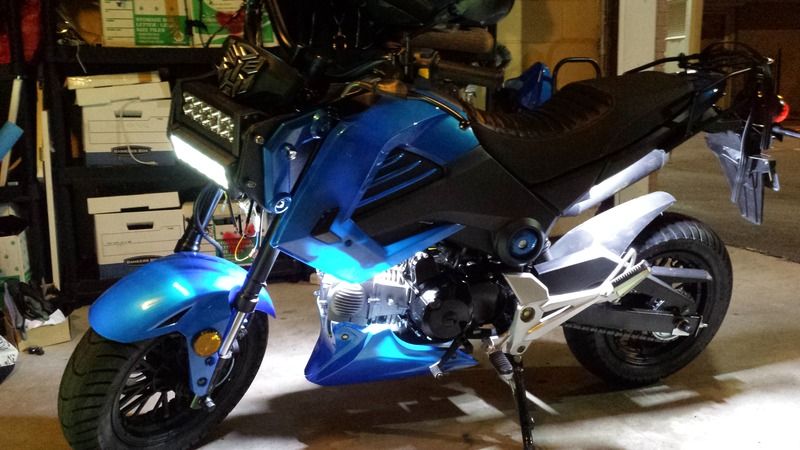
|
|
|
|
05-02-2017, 07:54 PM
|
#9 |

Join Date: Apr 2017
Location: Montevallo, AL
Posts: 103
|
That looks kick ass
 I wish I could do LED headlights, but I'll have to convert the Monster's headlight circuit from AC to DC and electrical engineering isn't my forte. I wish I could do LED headlights, but I'll have to convert the Monster's headlight circuit from AC to DC and electrical engineering isn't my forte.
__________________
2017 Ice Bear Little Monster, work in progress 2007 Aprilia RSV1000R, unreliable piece of sh*t 2007 Moto Guzzi Breva V1100, epitome of reliability 2000 Moto Guzzi California V11, resting in pieces The cage: 1998 BMW Z3, 1.9L w/full Dinan engine upgrades |
|
|
|
05-02-2017, 10:05 PM
|
#10 | |
|
Join Date: Apr 2017
Location: Boston area
Posts: 171
|
Actually, you can wire it directly to your battery and as long as your load is not higher than the amount your stator generates, it should be fine. The tricky part is that you would need to modify your current wiring if you want to use the existing light switch. If you're willing to go to an external switch, it might be easier.
Other option is to install HID but not sure if your electrical system can support that. Quote:
|
|
|
|
|
05-02-2017, 11:49 PM
|
#11 | |

Join Date: Apr 2017
Location: Omaha, NE
Posts: 8,030
|
Quote:
If you search on Youtube or google, you can find a lot of information about it. I am by no means an electrical guru either, but I have successfully done one conversion on a previous bike I owned years ago. |
|
|
|
|
05-03-2017, 06:55 AM
|
#12 | |
|
Join Date: Apr 2017
Location: Montevallo, AL
Posts: 103
|
Quote:
Once I relocate the ignition I should have enough room behind the headlight for the hardware. I tried hooking up a pair of HIDs last week and got nada.
__________________
2017 Ice Bear Little Monster, work in progress 2007 Aprilia RSV1000R, unreliable piece of sh*t 2007 Moto Guzzi Breva V1100, epitome of reliability 2000 Moto Guzzi California V11, resting in pieces The cage: 1998 BMW Z3, 1.9L w/full Dinan engine upgrades |
|
|
|
|
05-04-2017, 04:41 PM
|
#13 | |
|
Join Date: Apr 2017
Location: Boston area
Posts: 171
|
When you say HID, did it come with a ballast? if so, you don't need to build a converter as the ballast will do it for you.
here's an example: https://www.amazon.com/OPT7-Blitz-35...headlight&th=1 I'm actually surprised your electricity is AC. Quote:
|
|
|
|
|
|

|
 |
|
|


 Linear Mode

