 07-22-2018, 08:29 PM
|
#1 |

Join Date: Jul 2018
Posts: 212
|
Hawk 250 - Performance Exhaust - some notes
Just finished installing a performance exhaust on my Hawk (photos included). I followed Motocheez's how-to, drilled the holes out on that flange to 1/2" (was a real nightmare because that metal is very hard to drill), and it STILL didn't quite fit over those bolts on the head. I ended up cutting the edge of one side of the flange in order to bolt it to the head. That took over an hour alone because of how long it took to drill out one of the sides. Fitting the exhaust on the rest of the way was relatively easy...just slip the rear portion of the exhaust over the front part and secure it to the existing hole already in the frame.
For the muffler, I didn't want it hanging as low as what I have seen others do - I drilled another small hole in the frame and bolted the muffler bracket directly to the frame so it's nice and tight. I wrapped fiberglass cloth pipe tape around the pipe that passes underneath the airbox to prevent burning the airbox. I may just remove the airbox and go with a cone-style air filter bolted directly to the carb at some point in the future. For now this seems to work. If I were to do this mod again, I'd probably cut both the stock/OEM and the performance exhaust pipes, remove the flanges and swap them, then have the performance pipe welded back together. That would've made the job MUCH easier. Overall there's a noticeable gain in horsepower and top speed with the new exhaust installed - the Hawk isn't really louder, it just sounds BETTER. After riding a few miles, there's already a lot of bluing at the front of the pipe...it gets hot up there.  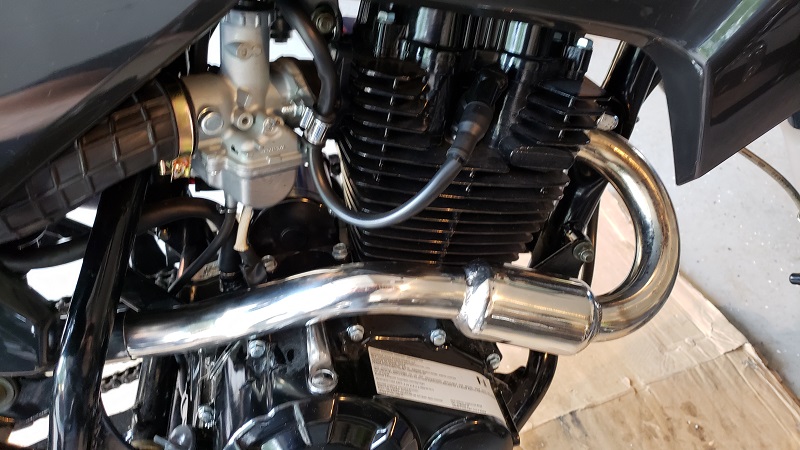 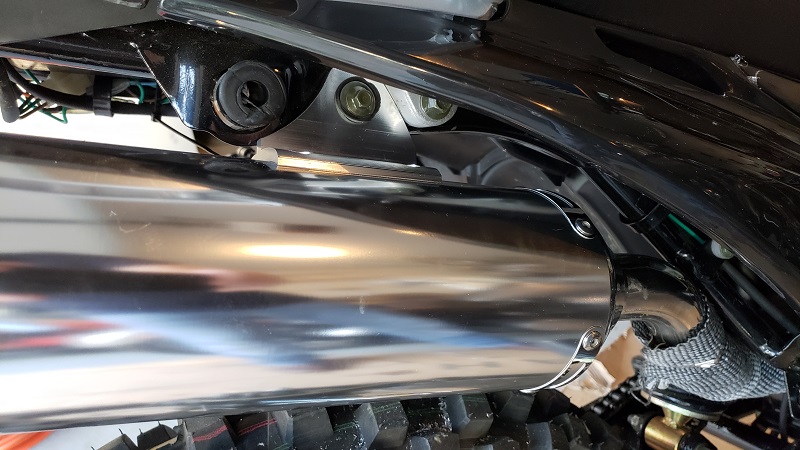
__________________
2018 RPS Hawk 250cc Mods so far: 1. Mikuni VM26 Carburetor w/#115 main jet 2. 17T/45T JT sprockets 3. JT 428 X-ring chain 4. Air box mod 5. Hawk Digital Cluster 6. Aftermarket IMS shift lever 7. Performance Aftermarket Exhaust 8. 295mm Nitrogen Gas Monoshock, 20W oil front forks |

|
|
07-22-2018, 08:44 PM
|
#2 |

Join Date: Jan 2018
Location: Forney Texas
Posts: 498
|
nice job! sounds just like my experience.
__________________
Visit me on YouTube at "Project Next"! https://www.youtube.com/channel/UC6KTCi2GVbfRDv-2XCqHhsg?view_as=subscriber 2017 Bashan Storm Keihen PZ30 Pumper Carb,115 main jet,35 pilot jet, gutted factory exhaust, Sambo Digital Speedometer,LED blinkers, H4 headlight,D.I.D X-ring chain 428,17/42 sprockets,UNI cone filter. |
|
|
|
07-23-2018, 08:17 AM
|
#3 |
|
Join Date: Jul 2018
Posts: 212
|
I didn't realize the flange would be so difficult to deal with. I should've slotted one side and left the other as-is. It still bolts up flush to the head so overall no harm no foul, but I'd still like to get that stock flange onto the aftermarket pipe. Know a few guys with welding equipment so I'll probably go that route in the future. The aftermarket pipe definitely gets hot up front, but it also cools down more quickly than the OEM pipe. I may paint it black again because the brass color looks somewhat ugly now that I've run the engine through varying RPM's riding a few miles on the new pipe.
__________________
2018 RPS Hawk 250cc Mods so far: 1. Mikuni VM26 Carburetor w/#115 main jet 2. 17T/45T JT sprockets 3. JT 428 X-ring chain 4. Air box mod 5. Hawk Digital Cluster 6. Aftermarket IMS shift lever 7. Performance Aftermarket Exhaust 8. 295mm Nitrogen Gas Monoshock, 20W oil front forks |
|
|
|
07-23-2018, 01:30 PM
|
#4 |
|
Join Date: Jun 2018
Location: Central Florida
Posts: 55
|
Not quite as blued as mine and i have barely ridden 15 miles so far with new exhaust. lol although i think mine is running lean but i dont know is everyones this blued. I put titanium exhaust wrap on it yesterday though
__________________
----------------------------------------------------- "Take it easy, if its easy take it twice" 2015 CSC TT250 -Ebay exhaust -Exhaust wrap -Wingsmoto Air bent filter (POD) -Outerwears prefilter for POD -CSC jets 115 and 40 -15 weight front fork oil -47 tooth JTR269.47 rear sprocket -JT 428 HDR (128 link) Heavy Duty Drive Chain -LED tail light bulb -Auxbeam LEDF-S2 headlight bulb -Brush hand guards -30L removable tail box (ebay) -3.1amp waterproof usb charger |
|
|
|
07-23-2018, 02:24 PM
|
#5 |
|
Join Date: Jul 2018
Posts: 212
|
Mine is no doubt headed that way...I took the photos yesterday before I rode about 5 miles on it. It's much more brass-colored now.
__________________
2018 RPS Hawk 250cc Mods so far: 1. Mikuni VM26 Carburetor w/#115 main jet 2. 17T/45T JT sprockets 3. JT 428 X-ring chain 4. Air box mod 5. Hawk Digital Cluster 6. Aftermarket IMS shift lever 7. Performance Aftermarket Exhaust 8. 295mm Nitrogen Gas Monoshock, 20W oil front forks |
|
|
|
07-23-2018, 02:36 PM
|
#6 |
|
Join Date: Jun 2018
Location: Central Florida
Posts: 55
|
I noticed a huge difference in heat after i wrapped the pipe. Id really recommend it and its fairly easy to do. I did mine with it on the bike which i think is the only way you could do it unless you do it in sections first. but you will realize how hot that pipe gets to the point that i was not comfortable riding it. Especially with shorts on, and yes im fully aware you shouldnt ride with shorts but who ever says that probably isnt living in florida or texas or arazona.
Ill try and remember to take some pics of it tonight i like the look myself
__________________
----------------------------------------------------- "Take it easy, if its easy take it twice" 2015 CSC TT250 -Ebay exhaust -Exhaust wrap -Wingsmoto Air bent filter (POD) -Outerwears prefilter for POD -CSC jets 115 and 40 -15 weight front fork oil -47 tooth JTR269.47 rear sprocket -JT 428 HDR (128 link) Heavy Duty Drive Chain -LED tail light bulb -Auxbeam LEDF-S2 headlight bulb -Brush hand guards -30L removable tail box (ebay) -3.1amp waterproof usb charger |
|
|
|
07-23-2018, 03:05 PM
|
#7 |
|
Join Date: Jul 2018
Posts: 212
|
I used heat wrap around the pipe where it runs under the air box to prevent it from melting. I have a lot of it left though so I'll probably use it to wrap the rest of the pipe.
__________________
2018 RPS Hawk 250cc Mods so far: 1. Mikuni VM26 Carburetor w/#115 main jet 2. 17T/45T JT sprockets 3. JT 428 X-ring chain 4. Air box mod 5. Hawk Digital Cluster 6. Aftermarket IMS shift lever 7. Performance Aftermarket Exhaust 8. 295mm Nitrogen Gas Monoshock, 20W oil front forks |
|
|
|
07-23-2018, 08:47 PM
|
#8 |
|
Join Date: Nov 2016
Location: robertsdale alabama usa
Posts: 1,007
|
make sure the wrap isnt touching the airbox or it will still melt. 1/4" air gap should suffice
__________________
1991 harley heritage softail classic 2016 hawk kaw h1 400 tripple 13' long chopper in progress 2009 johnny pag bar hog 2004 hd electra glide ultra classic shriner edition 1997 harley davidson 1200 sportster 1972 harley davidson amf sx250 |
|
|
|
07-23-2018, 09:03 PM
|
#9 |
|
Join Date: Jul 2018
Posts: 212
|
Mine is awful close and just about touching. Is there a way to adjust the airbox so that it sits a bit higher off the pipe? Maybe some washers or spacers below where the air box screws into the frame to lift it up somewhat? I don't have much wiggle room with the way the pipe is mounted to the frame.
__________________
2018 RPS Hawk 250cc Mods so far: 1. Mikuni VM26 Carburetor w/#115 main jet 2. 17T/45T JT sprockets 3. JT 428 X-ring chain 4. Air box mod 5. Hawk Digital Cluster 6. Aftermarket IMS shift lever 7. Performance Aftermarket Exhaust 8. 295mm Nitrogen Gas Monoshock, 20W oil front forks |
|
|
|
07-23-2018, 09:26 PM
|
#10 |

Join Date: Sep 2017
Location: N Texas
Posts: 706
|
Glad you got er done. What jet did you finally go with in the carb?
My pipe is about 1/8" of an inch from the airbox with no wrap. Still has not melted yet. |
|
|
|
07-23-2018, 10:19 PM
|
#11 |
|
Join Date: Jul 2018
Posts: 212
|
I just re-jetted to a #120...I pulled the spark plug after full throttling and killing the engine, noticed the plug was a little too clean and had white residue on it, so the engine was still running a bit lean on the #110. I rode the Hawk about 3 miles and shifted through all the gears and opened up the throttle, seems to run fine on the #120 with a somewhat lower engine pitch so it's gotta be running richer.
Those Wingsmoto Mikuni jets are trash IMO. They don't thread very well into the carb and when you unscrew them they get pretty mangled up on the way out. The #110 was a Wingsmoto jet and getting it out of the carb wasn't pleasant. I got it out without too much damage but had to trash it. I'll probably stick with the #120 as the engine seems to be running well on it. I'll throttle it up again tomorrow and check the spark plug again to make sure it's not too rich (no bogging when the throttle is opened up). If the air box melts through I'll fill the bottom with high-temp silicone to seal it up and plug it for good. There's probably less than a 1/8" gap but there was enough room to get pipe wrap under it.
__________________
2018 RPS Hawk 250cc Mods so far: 1. Mikuni VM26 Carburetor w/#115 main jet 2. 17T/45T JT sprockets 3. JT 428 X-ring chain 4. Air box mod 5. Hawk Digital Cluster 6. Aftermarket IMS shift lever 7. Performance Aftermarket Exhaust 8. 295mm Nitrogen Gas Monoshock, 20W oil front forks Last edited by ChrisWNY; 07-24-2018 at 09:52 AM. |
|
|
|
07-24-2018, 08:04 PM
|
#12 |
|
Join Date: Jul 2018
Posts: 212
|
I got the carb tuned further - the Hawk is running nice and rich now, can even see a little smoke coming out the muffler when I throttle it up when it's in neutral. When the Hawk was relatively stock with the stock carb settings, there was no visible exhaust at all coming from the muffler, just warm air more or less.
On the Mikuni carb, the snap ring on the needle is set right in the middle by default from the factory (3 up from the bottom, 3 down from the top). I lowered the snap ring one notch, so it's now on the 2nd notch up from the bottom of the needle. One more down and that needle is as rich as it can get, which I think would be too rich and would load the carb up too much while idling or at lower engine RPM's. I also turned the bottom slotted screw out another half turn or so on the bottom of the carb, definitely runs rich at all throttle settings including open throttle thanks to the #120 main jet. Engine does seem somewhat cooler after riding around a few miles. The noticeable difference is actual power in 4th and 5th gear. The Hawk cruises comfortably at about 55mph just beyond 1/2 throttle in 5th gear. Plenty of low-end torque as well for off-road riding. Takes right off and has a decent amount of power in the lower gears. Happy with how the carb is set up for the performance exhaust at this point. I had to turn the idle screw in about 3/4 turn so the engine idles without stalling out...the idle screw is roughly 1.5 turns out now. Here's a nice technical guide for tuning Mikuni carbs for those interested... http://www.iwt.com.au/mikunicarb.htm
__________________
2018 RPS Hawk 250cc Mods so far: 1. Mikuni VM26 Carburetor w/#115 main jet 2. 17T/45T JT sprockets 3. JT 428 X-ring chain 4. Air box mod 5. Hawk Digital Cluster 6. Aftermarket IMS shift lever 7. Performance Aftermarket Exhaust 8. 295mm Nitrogen Gas Monoshock, 20W oil front forks |
|
|
|
07-25-2018, 08:25 AM
|
#13 | |
|
Join Date: Jun 2018
Location: Central Florida
Posts: 55
|
Quote:
Even though i have gotten so much helpful info from so many great members on here this by far has helped me understand the carborator more than anything. Thank you so much for listing it. I have the stock TT250 carb but this is still invaluable info for me. This should be a permanent sticky for everyone to have easy quick accesss to it would make everyones life easier. even the helpful people on here they wouldnt have to repeat them selves (bless their hearts) over and over to new members (me included) with same issues. i think i know how to fix my issue now.  
__________________
----------------------------------------------------- "Take it easy, if its easy take it twice" 2015 CSC TT250 -Ebay exhaust -Exhaust wrap -Wingsmoto Air bent filter (POD) -Outerwears prefilter for POD -CSC jets 115 and 40 -15 weight front fork oil -47 tooth JTR269.47 rear sprocket -JT 428 HDR (128 link) Heavy Duty Drive Chain -LED tail light bulb -Auxbeam LEDF-S2 headlight bulb -Brush hand guards -30L removable tail box (ebay) -3.1amp waterproof usb charger |
|
|
|
|
07-25-2018, 08:45 AM
|
#14 |
|
Join Date: Jun 2018
Location: Central Florida
Posts: 55
|
The only thing im confused is in this link it mentions
"pilot jet screw can be turned in or out to change the air-fuel mixture. If the screw is in the back of the carburetor, screwing it out will lean the mixture while screwing it in will richen it. If the adjustment screw is in the front of the carburetor, it will be the opposite." Every one has been saying on multiple threads and you tube videos (mostly hawk related) to back it out to get it richer and to thread it in to make it leaner. but my screw on my TT250 is in back i believe (front air intake and back is attached to engine right) so according to this link i should be doing the opposite. Am i correct? I dont know what the Mikuni or hawk carbs look like maybe they both have them in front and that is why everyone is saying to back it out.
__________________
----------------------------------------------------- "Take it easy, if its easy take it twice" 2015 CSC TT250 -Ebay exhaust -Exhaust wrap -Wingsmoto Air bent filter (POD) -Outerwears prefilter for POD -CSC jets 115 and 40 -15 weight front fork oil -47 tooth JTR269.47 rear sprocket -JT 428 HDR (128 link) Heavy Duty Drive Chain -LED tail light bulb -Auxbeam LEDF-S2 headlight bulb -Brush hand guards -30L removable tail box (ebay) -3.1amp waterproof usb charger |
|
|
|
07-25-2018, 11:04 AM
|
#15 |
|
Join Date: Jul 2018
Posts: 212
|
When you turn the idle screw in, it restricts the flow of air (at idle only) therefore the mixture is more rich, more fuel less air. Turning the screw outward will allow more air in therefore leaning the mixture at idle. Choking the carb restricts airflow and therefore makes the mixture rich.
__________________
2018 RPS Hawk 250cc Mods so far: 1. Mikuni VM26 Carburetor w/#115 main jet 2. 17T/45T JT sprockets 3. JT 428 X-ring chain 4. Air box mod 5. Hawk Digital Cluster 6. Aftermarket IMS shift lever 7. Performance Aftermarket Exhaust 8. 295mm Nitrogen Gas Monoshock, 20W oil front forks |
|
|
|
|

|
 |
|
|


 Linear Mode

