 02-06-2015, 11:03 AM
|
#1726 |

Join Date: Jan 2015
Location: England
Posts: 382
|
Yep, it was 14 teeth
Here is a pic so you can see the set up. Shows my side stand too.  Originally before I cut it off there was a 1 inch, non threaded portion that was part of the pivot bolt. The kidney shaped bit of pressed steel was the other way around (dished side towards the bike) .The indent part on its side making contact with this non threaded bit of the bolt but on the right hand side when the stand was down. I probably could have just turned the bolt around rather than cutting it. Too late now!   The arrow is pointing towards the air box intake; at the right angle you can see the sponge filter element. To the right of this is a line of 3 bolt holes where the seat attached. From there to the right under the pillion seat was a plastic panel. The Delphi unit etc. Is what you see under that.  Plenty of thread here for adjustment , above and below the end of the spring.  Battery YTZ12S-BS 12V 11ah |

|
|
02-06-2015, 11:52 AM
|
#1728 |
|
Banned
Join Date: Oct 2014
Posts: 223
|
Agreed 3 banger, WELL DONE, Zong!
Unreal $ for hp IMHOThe underseat layout is VERY unusually well thought out and done, IMHO, even vs Jap and other quality motorcycles, IMHO.
Easy to find and identify all parts (for ease of owner maintainance and servicing.) This is really starting to make me think this IS the "breakthrough" bike from China! Though Spud, and others probably think they already have them (the 200's  ! This bike, is currect, even cutting edge in some areas, and user friendly for mods also, unlike some other bikes. ! This bike, is currect, even cutting edge in some areas, and user friendly for mods also, unlike some other bikes. If we get the fueling (EJK) or similar, I am pretty sure I'm going to turbo mine. Probably start with 5-6 lbs boost, no ICooler etc. Then go from there. The MPFab Yamaha Wr250 kit has proven VERY durable, and extremely powerfull, as well, on those motorcycles. The weight addition is minimal as a % of total weight, but doubling almost the tq and HP while improving fuel economy (if not boosting, of course) REALLY appeals to me. The improved atomization and air fuel mixing yields the better economy. I'm on a forum where quite a few members and 1st gen Insight owners turboed their cars, with very good results. The fuel additions were done without ANY ecu tuning, and vary from crude to non effictive, IMHO, but so far proven very reliable. The Only failure was a holed piston after over 250,000 miles (right, 1/4 million miles), and only had an additional injector that fired under boost (maybe not always, after those miles, causing lean failure)? ANyway, I got no issue with a piston every 100,000 miles or so, and I will tune mine thoroughly, also. The Insight has not got squirters, which would most likely pulled enough heat from the piston to keep it from melting, IMHO. MPFab does the Wrr kit. I will attempt a group buy when I get ready to do the install, and document it on here as well. Anyone interested? Link to MPFab kit is here (for Wrr250). http://www.mpfab.com/product/mpfab-s...amaha-wr250xr/ Cost, all up, is $2050.00, now. Unreal cost to hp ratio..best of anything, IMHO. ALso reliable if done as recommended. A big bore kit will possibly throw off engine balancer, and has to be tuned as well, costing the same or more, for less gains, probably. Just my 2cents ...
|
|
|
|
02-06-2015, 12:02 PM
|
#1729 |
|
Banned
Join Date: Oct 2014
Posts: 223
|
Talked with Walker (Morgan) just now. Kit is a go:)!
Due to spotty sales on the (since 2008) wr250 kit, he may do a GB, maybe not, but wants to check the bike out and agreed to do one for my bike. (I've bugged him about a wr250 kit re details etc since I started looking at them a couple yrs ago).
He liked the piston squirter being on it already as well, for boost upgrade possibilities later on. He says the turbo car parts sell better and more consistantly, why he is kinda drifting away from the motorcycles a bit. He rides a turbo wr250, though, and is interested in the RX-3 as well. I sure hope he gets REALLY liking it when he reads up on it via my link i sent him to CSC and here .
|
|
|
|
02-06-2015, 01:14 PM
|
#1730 |

Join Date: Jul 2008
Location: Idaho
Posts: 25,054
|
Katflap,
Thanks for posting the excellent photographs. Did you have much difficulty removing the saddle to access the air filter element?It appears the plastic side covers are painted, and the color is not molded into the plastic. Is this correct?
__________________
Spud "Never argue with an idiot. He will drag you down to his level, and beat you with experience."  Mark Twain Mark Twain2015 Zongshen ZS250GY-3 (RX3) 2006 Zongshen ZS200GY-2 (Sierra 200) 2005 Honda XR650L 2004 Honda CRF250X 1998 Kawasaki KDX220 Mods made to my Zongshen ZS200GY-2: http://www.chinariders.net/showthread.php?t=6894 |
|
|
|
02-06-2015, 04:46 PM
|
#1731 |
|
Banned
Join Date: Oct 2014
Posts: 223
|
Alos
Re Spud Q. Is there a latch, or do you have to unscrew the seat for access?
Thanks! |
|
|
|
02-06-2015, 05:09 PM
|
#1732 | |
|
Join Date: Jul 2008
Location: Idaho
Posts: 25,054
|
Quote:
 I am adding this link under the Manuals subheading of the RX3 Sticky thread, which is pinned to the top of this Dual Sport Forum. I am adding this link under the Manuals subheading of the RX3 Sticky thread, which is pinned to the top of this Dual Sport Forum. http://www.chinariders.net/showthread.php?t=14228
__________________
Spud "Never argue with an idiot. He will drag you down to his level, and beat you with experience." Mark Twain2015 Zongshen ZS250GY-3 (RX3) 2006 Zongshen ZS200GY-2 (Sierra 200) 2005 Honda XR650L 2004 Honda CRF250X 1998 Kawasaki KDX220 Mods made to my Zongshen ZS200GY-2: http://www.chinariders.net/showthread.php?t=6894 |
|
|
|
|
02-06-2015, 05:30 PM
|
#1733 |
|
Join Date: Jul 2008
Location: Idaho
Posts: 25,054
|
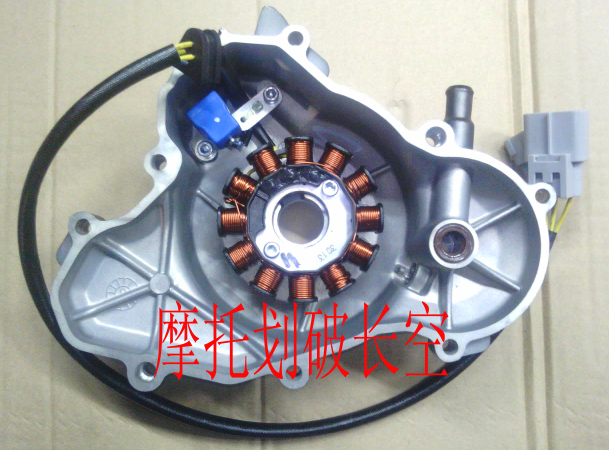
The Zongshen RX3 will be my first motorcycle with electronic fuel injection (EFI). Looking at the wiring diagram, it appears the Delphi MT05 ECU (engine control unit) incorporates the equivalent of a DC-CDI unit, since I don't see a source/charging coil on the bike's stator. The following photograph seems to verify this conclusion.
__________________
Spud "Never argue with an idiot. He will drag you down to his level, and beat you with experience." Mark Twain2015 Zongshen ZS250GY-3 (RX3) 2006 Zongshen ZS200GY-2 (Sierra 200) 2005 Honda XR650L 2004 Honda CRF250X 1998 Kawasaki KDX220 Mods made to my Zongshen ZS200GY-2: http://www.chinariders.net/showthread.php?t=6894 |
|
|
|
02-06-2015, 05:45 PM
|
#1734 |
|
Join Date: Jan 2015
Location: England
Posts: 382
|
@ 3banger --
yeah it does all seem very sturdy and of good quality , nothing shabby here ! @ SpudRider & thillskier -- In the side panel on the left hand side there is a key lock which operates a latch to release the pillion seat . you probably know this already. you can see the cable operated latch just to the left of the 2 large allen bolts in the picture. The pillion seat slides up and out. you can then see a bracket. This bracket is secured to 2 of 3 bolt holes that i mentioned in my earlier post that are next to the air filter box by 8mm bolts . There is like a plastic tongue on the front of the pillion seat that slides under this bracket keeping it in position. The riders seat is removed by un screwing these 2 bracket bolts . The bolts also go through the back seat fixing . The seat lifts up ,sliding the front plastic tongue from under a slot under the tank and away ! so all pretty easy. spud you have caught me out on your other questions  i wasnt paying enough attention when i took the seats off . i wasnt paying enough attention when i took the seats off .it looked like to actually change or clean the air filter element the whole air box might have to come out as you can see in the picture there is a centre seem running vertically which might be the only way to get to the element. regarding the side covers i agree they are not orange on the inside . however the orange covering looks very good. I will have to get back to you on these 2 questions with hopefully better answers To access the battery was behind a black plastic strip held by 3 screws. the strip is solid black in colour and quite flexible , unlikley to crack i think . this strip should be able to be removed with the seats on. The orange side panels are less flexible so would probably crack at the fixings if they got a beating ! |
|
|
|
02-06-2015, 05:49 PM
|
#1735 | |
|
Join Date: Jan 2015
Location: England
Posts: 382
|
Quote:
|
|
|
|
|
02-06-2015, 06:00 PM
|
#1736 | |
|
Join Date: Jul 2008
Location: Idaho
Posts: 25,054
|
Quote:
As with my Zongshen ZS200GY-2, the upper side covers are probably manufactured from ABS, instead of polypropylene. Since they are painted, they will probably fade in the sunlight. I repaint the upper side covers on my Zongshen Sierra every year or two for this reason. Please check the front fender and the rest of the plastic on your bike. All of the black plastic is probably polypropylene, which is good. The fuel tank is metal, so it won't present a problem. I'm hoping only the upper, rear side covers are manufactured from ABS.
__________________
Spud "Never argue with an idiot. He will drag you down to his level, and beat you with experience." Mark Twain2015 Zongshen ZS250GY-3 (RX3) 2006 Zongshen ZS200GY-2 (Sierra 200) 2005 Honda XR650L 2004 Honda CRF250X 1998 Kawasaki KDX220 Mods made to my Zongshen ZS200GY-2: http://www.chinariders.net/showthread.php?t=6894 |
|
|
|
|
02-06-2015, 06:16 PM
|
#1737 | |
|
Join Date: Jan 2015
Location: England
Posts: 382
|
Quote:
Hope to find time to do this tomorrow . 11pm here now |
|
|
|
|
02-06-2015, 06:57 PM
|
#1738 | |

Join Date: Sep 2014
Posts: 175
|
Quote:
__________________
Honda CB300R ABS |
|
|
|
|
02-06-2015, 07:58 PM
|
#1739 | |
|
Join Date: Jul 2008
Location: Idaho
Posts: 25,054
|
Quote:
Please also check the colored, plastic, lower fork guards. I suspect they also might be painted ABS, instead of polypropylene.
__________________
Spud "Never argue with an idiot. He will drag you down to his level, and beat you with experience." Mark Twain2015 Zongshen ZS250GY-3 (RX3) 2006 Zongshen ZS200GY-2 (Sierra 200) 2005 Honda XR650L 2004 Honda CRF250X 1998 Kawasaki KDX220 Mods made to my Zongshen ZS200GY-2: http://www.chinariders.net/showthread.php?t=6894 |
|
|
|
|
02-06-2015, 08:07 PM
|
#1740 | |

Join Date: Mar 2012
Location: south west (uk)
Posts: 106
|
Quote:
__________________

|
|
|
|
|
|

|
 |
|
|


 Linear Mode

