 01-01-2017, 06:56 PM
|
#1 |
|
Join Date: Feb 2016
Location: Portsmouth, Virginia, USA
Posts: 632
|
TT250 swingarm lube
On a rainy day it's prime time to do garage stuff. Checking the swingarm on my TT250 sounded like a good idea. This is a new bike so I'm just establishing a baseline. The CSC tutorial is perfect, take a look and you know exactly what needs to be done. I'd rate this as a 1 hour job.
OK, the swingarm and shock pivot point are not needle bearings. They are all bushings. Mine had some grease so I just added a bunch more. More is better in this case. The factory had done a decent job, I just added more and gained a bit more confidence in the the bike. While I was at it, I took both the swingarm bolt and the axle bolt over to my lathe and added a center punch so now I can accurately measure the swingarm to axle length. Peter Y. |

|
|
01-01-2017, 09:22 PM
|
#2 |

Join Date: Mar 2010
Location: Volcano, Ca
Posts: 7,065
|
Mine varied from "some" grease to "almost none". Good idea to do this project when it's a no-ride day.
__________________
"Light a fire for a man, and you heat him for a day. Light a man on fire, and you heat him for the rest of his life." 2007 Suzuki DRZ400S (SM convert) 2009 Q Link XP 200 1967 BSA B25 250cc Starfire 2022 Royal Enfield Interceptor 650 2023 Royal Enfield Scram 411 1948 Royal Enfield Model G 350 |
|
|
|
01-02-2017, 03:27 PM
|
#3 |

Join Date: Mar 2009
Location: Sardis, BC, Canada
Posts: 25,977
|
I like the center punch idea. Did you punch both ends of the swingarm bolt?
__________________
Weldangrind "I figure I'm well-prepared for coping with a bike that comes from the factory with unresolved issues and that rewards the self-reliant owner." - Buccaneer |
|
|
|
01-02-2017, 05:24 PM
|
#4 |
|
Join Date: Feb 2016
Location: Portsmouth, Virginia, USA
Posts: 632
|
Weld, yes...both ends. The axle already had a center punch on the threaded end, I only had to do the bolt end. Now I can accurately measure to make sure the swingarm bolt and axle bolt are parallel.
 This homemade tool makes measuring a snap once you have the center punch in each axle. I have done the same mod to my RX3. Peter Y. |
|
|
|
01-03-2017, 11:00 AM
|
#5 |
|
Join Date: Mar 2009
Location: Sardis, BC, Canada
Posts: 25,977
|
My next question was going to be about the best way to measure between the swingarm bolt and the axle, but you answered that for me.

__________________
Weldangrind "I figure I'm well-prepared for coping with a bike that comes from the factory with unresolved issues and that rewards the self-reliant owner." - Buccaneer |
|
|
|
01-03-2017, 11:24 AM
|
#6 |
|
Join Date: Oct 2015
Posts: 75
|
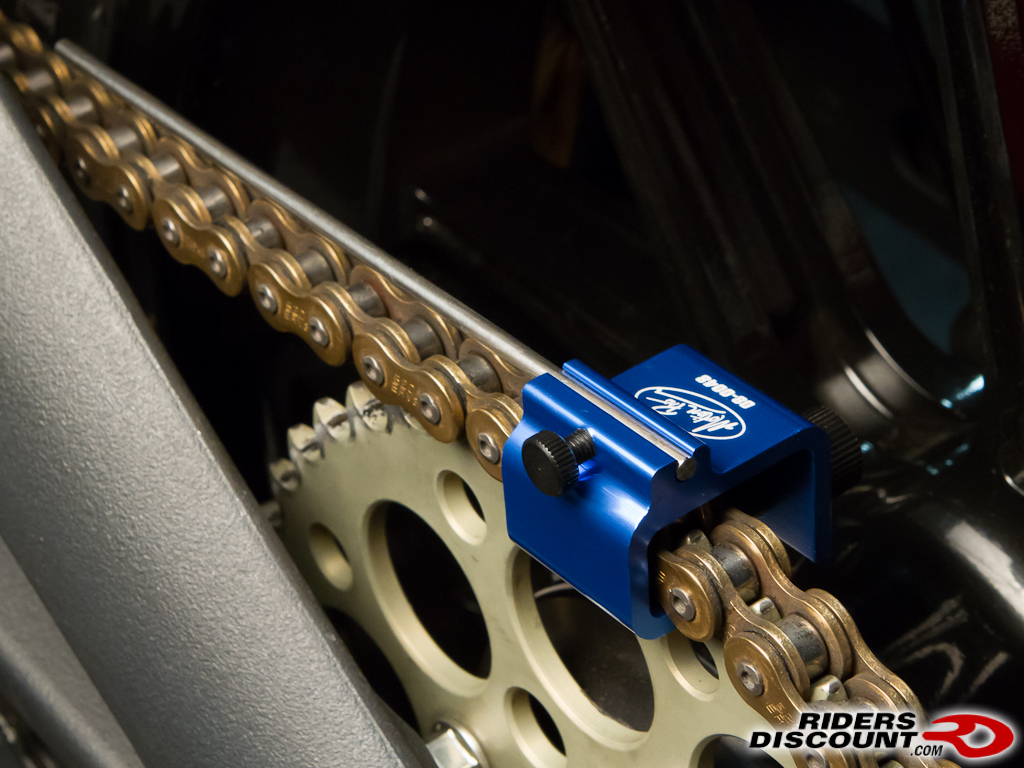
I would go with something like this. Very simple and you could take it on the trail with you if need be. They are made by a couple of different companies, Motion Pro being one of them.
|
|
|
|
01-03-2017, 11:49 AM
|
#7 |

Join Date: Dec 2016
Location: Western PA
Posts: 363
|
You can also use a ruler (metal one is best, but any will do as long as it is stiff and straight).
Position it against the inside of the side plates on the rear sprocket at about 45 degrees upwards, then gently rotate the tyre and see where it lines up on the chain as you move it toward horizontal. |
|
|
|
01-03-2017, 08:03 PM
|
#8 |
|
Join Date: Feb 2016
Location: Portsmouth, Virginia, USA
Posts: 632
|
I think we have about 100 years of experience with getting the chain aligned so whatever works for you is OK with me. My method works best for me in the garage, on the road I'll use the Mark 1 eyeball.
Peter Y. |
|
|
|
01-04-2017, 08:15 AM
|
#10 | |
|
Moderator

Join Date: Oct 2016
Location: Houma, La.
Posts: 11,538
|
Quote:
 Gives me a peace of mind knowing it is greased up. Beats the hell out of pulling the swing arm bolt to grease it and most of the grease gets wiped off when you reassemble. Fill it till it just starts to ooze out. Gives me a peace of mind knowing it is greased up. Beats the hell out of pulling the swing arm bolt to grease it and most of the grease gets wiped off when you reassemble. Fill it till it just starts to ooze out.
__________________
2023 Lifan Lycan 250 Chopper 2023 Venom Evader 2022 Lifan KPX250 2020 Kawasaki Vulcan S 2004 Honda ST 1300 2016 Black Hawk 250 (sold) Keihin PE30 carb,125 main,38 slow.Pod filter,ported & decked head 10:1 CR,Direct Ignition Coil,15/40Sprockets,NGK DPR8EIX-9,De-Cat,Dual Oil Cooler,Digital Cluster 2016 Cazador180 XL 2014 Coolster150 JerryHawk250.com My YouTube Channel |
|
|
|
|
01-04-2017, 03:16 PM
|
#12 | |
|
Moderator
Join Date: Oct 2016
Location: Houma, La.
Posts: 11,538
|
Quote:
__________________
2023 Lifan Lycan 250 Chopper 2023 Venom Evader 2022 Lifan KPX250 2020 Kawasaki Vulcan S 2004 Honda ST 1300 2016 Black Hawk 250 (sold) Keihin PE30 carb,125 main,38 slow.Pod filter,ported & decked head 10:1 CR,Direct Ignition Coil,15/40Sprockets,NGK DPR8EIX-9,De-Cat,Dual Oil Cooler,Digital Cluster 2016 Cazador180 XL 2014 Coolster150 JerryHawk250.com My YouTube Channel |
|
|
|
|
01-04-2017, 10:23 PM
|
#13 | |

Join Date: Feb 2016
Location: George West, Texas
Posts: 4,097
|
Quote:
__________________
***************************************** 2015 Bashan"Blaze" BS250GY-31 (DB-07K-250) GONE 2017 Suzuki V Strom 650 XT "We are all born ignorant, but one must work hard to remain stupid." ~Benjamin Franklin~
|
|
|
|
|
01-05-2017, 08:50 PM
|
#14 | |

Join Date: Aug 2016
Location: Tennessee
Posts: 11
|
Quote:
This just went on my mods list! 
|
|
|
|
|
01-06-2017, 07:52 AM
|
#15 | |
|
Join Date: Oct 2016
Location: Carrollton, GA
Posts: 1,465
|
Quote:

__________________
First Rule of Aviation: -Never Pass Up The Opportunity to Pee I was struggling to get my wife's attention; I sat down on the couch and looked comfortable. That did the trick! My wife says I only have two faults. I don't listen and something else... If at first you don't succeed, try doing it the way I told you to... The Stable: 2005 Yamaha V-Star 650 - SOLD 2015 Suzuki DR 650 2015 RPS Hawk 250 - SOLD 2016 Ural Gear Up |
|
|
|
|
|

|
 |
|
|


 Linear Mode

