 10-12-2020, 02:22 AM
|
#76 |
|
Join Date: Aug 2020
Location: Australia
Posts: 1,256
|
I got the PZ27 cleaned and running on the Honda 163 engine. but the throttle grip was past its prime.
Then looking around and the PZ30b pumper seems to turn up in mentions on the regular. and the complete kit on Ali was reasonably priced and came with the choke cable bracket that was missing on my P27 I have mildly ported the head so I doubt the PZ27 would keep up and keep to lean. Basically the PZ30b kit was a triple win. but the real real deal will come when the bike finally fires up. |

|
|
10-12-2020, 11:55 AM
|
#77 |
|
Join Date: Dec 2018
Location: PNW
Posts: 982
|
I like the PZ30b and think it a very good carburetor, especially with low gearing and has great acceleration. If you haven't checked it out there is the PZ30B thread that covers it all. That PZ27 looks to me to be a good experiment one day with the right jets who knows for sure?
|
|
|
|
10-12-2020, 06:36 PM
|
#78 |
|
Join Date: Aug 2020
Location: Australia
Posts: 1,256
|
Yeah China Rider27 I have glanced over the PZ30b thread and watched Oddballs YT video prior to making the purchase.
Still waiting for my Keihin jet kit bu the the Wuflu happened. So some things I ordered appeared to get stuck in a place called Nowhere. I found a new discounted chinesium cylinder/piston kit that should work with my Honda 163 so will likely be returning the P27 to its original place. When I find the spare time I'll have a go refreshing the 163. |
|
|
|
10-15-2020, 10:51 PM
|
#79 |
|
Join Date: Aug 2020
Location: Australia
Posts: 1,256
|
New Shoes
Fitted new rubber to the rims.
Decided to go with Dunlop 605s front and back. It felt like the right choice for this bike and were really the only choice given the correct size DOT approved options available to choose from from the retail supplier at an budget minded price. Researched whether the yellow spot on the tire was placed near the valve for balancing which was the case for Dunlop. So made the effort to try and and achieve the result. Would like to have said they went on without issue but I pinched my first HD rear inner tube and decided to not risk a failed patch job on new rubber. Probably wouldn't have ruined the tube if I didn't fit rim locks. just used a ebay set of tyre/tire levers to get the job done and personally would not like to have to do it again anytime soon. Last edited by XLsior; 02-18-2021 at 04:16 PM. |
|
|
|
10-28-2020, 05:51 PM
|
#80 |
|
Join Date: Aug 2020
Location: Australia
Posts: 1,256
|
New Piston & Rings, Shaving the Head For an empty wallet.
Greetings,
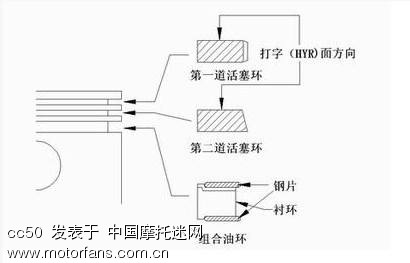
So the New 67mm Piston and Rings came in the post yesterday. Using a 10mm thick float glass panel for a flat surface and taping down some wet'n'dry 240/400 grit sand paper I cleaned up the cylinder mating surface just enough with 400 grit as keeping the stoke distance without interference here is important. Where you can take off some material is the Head to increase the compression. I didn't go to hard on the first pass. I have since purchased a sheet of 240grit to take away a little more surface material. then finish with 400 grit. the process isn't complicated. Even pressure with an orbital rotation action. turning the part 90* every so often. NOTE: the CG250 head lower exhaust stud has to be removed for complete surface contact. As for the Piston rings, All seems in order when compared to the shagged used parts. If anyone can impart a knowledge nugget regarding the ring order/orientation (I have taken photo showing Rings marked with D/DY) From what I recall the marking a faced up but not sure which is the top ring. Also any ideas on ring gaps? I'll take some more pics of the second Head shave and probably do another pool noodle cylinder hone pass with the 400 grit. Cheers for checking my project thread. |
|
|
|
10-29-2020, 01:44 AM
|
#81 |

Join Date: Mar 2008
Posts: 2,436
|
__________________
|
|
|
|
10-29-2020, 06:25 AM
|
#83 |
|
Join Date: Mar 2008
Posts: 2,436
|
Why not ref to good old AG200 https://ag200blog.wordpress.com/2013...0-service-info spec?
Rings [1.2/ 1.2/ 2.5] are interchangeable btw them...
__________________
|
|
|
|
10-29-2020, 04:56 PM
|
#84 |
|
Join Date: Aug 2020
Location: Australia
Posts: 1,256
|
I also found this Hartford manual for CG125-150 online.
https://www.manualslib.com/manual/82...rd-Cg-125.html 0.5mm limit and 0.15 minimal seems to be described. |
|
|
|
10-30-2020, 06:40 PM
|
#86 |
|
Join Date: Aug 2020
Location: Australia
Posts: 1,256
|
Nice BigFatAl, Would be great to see any photos of the before and after depending how deep you are into the project. Glad to find another Old honda revival aficionado.
Find enough of us and the forums might have to create a Chonda swaps page. |
|
|
|
10-30-2020, 10:09 PM
|
#87 |

Join Date: Oct 2019
Posts: 112
|
I bought a WHOLE truck load of XR200 parts ( enough to build 3 bikes plus probably $1,000 worth of extra parts for.....$100...
But only enough parts to build maybe 1 motor. I’ve already sold $500 worth of extra parts so that bought me the Tao Tao engine. I’ve never been able to figure out how to post pics on here. I’m pretty deep in mine right now |
|
|
|
10-31-2020, 09:11 PM
|
#88 |
|
Join Date: Aug 2020
Location: Australia
Posts: 1,256
|
I found to upload pictures I resize them to the smallest file size so they don't end up more than 95kb/JPEG.
Then click the little paperclip next to the (smilies) and upload the resized pictures. Hope that helps if you are so inclined to try and post photos of the project... |
|
|
|
11-12-2020, 03:48 AM
|
#89 |
|
Join Date: Aug 2020
Location: Australia
Posts: 1,256
|
No More Floppy Dong
Decided to nip the tip.
Sorry to any Honda purists out there. however if you've come this far you must be a sucker for punishment. Markings were just for visual aid not a cutting guide. I did a straight cut from both sides using normal hacksaw maintaining an angle and meeting in the center somewhat like a cross section if that make sense. cleaned up and scuffed with 400grit then found some left over Rust-oleum 2x spray paint+primer which seems to do ok on plastic so used it up as a primer. currently is curing with a coat spray etch filler. just another small step to keep the project ticking on. |
|
|
|
11-12-2020, 09:39 PM
|
#90 |
|
Join Date: Aug 2020
Location: Australia
Posts: 1,256
|
Front Fender Prep & Finish
i think there might have been some contaminants embedded in the plastic in some very specific locations where no matter how many attempts would reject any coating applications. underside was just srayed in satin black caliper paint.
Just trying to use up whatever rattle cans I have left... However 99% seemed to stick, so after a couple of spray filler and sand backs and then dumping the remains of a the can of etch primer I did a heavy color coat and 5 min later a clear coat as I don't have a hermetic sealed paint booth so waiting between coats tends to attract dust and critters. Overall the outcome was satisfactory how long long it will last is unknown. |
|
|
|
|

|
 |
|
|


 Linear Mode

