 04-25-2017, 10:08 PM
|
#1 |
Join Date: Feb 2016
Location: NY
Posts: 172
|
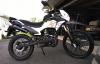
TT250 Exhaust video
Hey guys finally got around to installing the aftermarket exhaust on my TT250 last night...made a quick and terribly edited video with some info for anyone interested

__________________
2005 CBR600RR
2016 CSC TT250 Coming Soon |

|
|
04-26-2017, 04:20 AM
|
#4 |

Join Date: May 2016
Location: Bismarck, ND
Posts: 868
|
Did you buy the aluminum pipe? I have a pictures of the drills that I used for mine, but you probably have seen them...
__________________
2015 and 3/4 RPS Hawk 250. Most people would call it a 2016 but the MCO didn't. |
|
|
|
04-26-2017, 04:49 AM
|
#5 |

Join Date: Feb 2017
Location: NY
Posts: 170
|
looks and sounds good, nice job
 i was gonna get that for mine but after reading about all the fitment issues people were having with it on the hawk i decided to modify the stock exhaust, i cut out the cat. converter, removed the spark screen and drilled 1/2" holes down thru the baffles, |
|
|
|
04-26-2017, 07:05 PM
|
#6 | |
|
Join Date: Feb 2016
Location: NY
Posts: 172
|
Quote:
__________________
2005 CBR600RR
2016 CSC TT250 Coming Soon |
|
|
|
|
04-26-2017, 09:15 PM
|
#7 | |
|
Join Date: Feb 2017
Location: NY
Posts: 170
|
Quote:
i wouldnt say it was free, i had to buy a new mig welder to do it, the old one i had wouldnt feed wire, but i did get a new welder
|
|
|
|
|
04-26-2017, 09:37 PM
|
#8 | |

Join Date: Feb 2016
Location: George West, Texas
Posts: 4,097
|
Quote:

__________________
***************************************** 2015 Bashan"Blaze" BS250GY-31 (DB-07K-250) GONE 2017 Suzuki V Strom 650 XT "We are all born ignorant, but one must work hard to remain stupid." ~Benjamin Franklin~
|
|
|
|
|
04-26-2017, 09:55 PM
|
#10 | |
|
Join Date: Feb 2016
Location: George West, Texas
Posts: 4,097
|
Quote:
__________________
***************************************** 2015 Bashan"Blaze" BS250GY-31 (DB-07K-250) GONE 2017 Suzuki V Strom 650 XT "We are all born ignorant, but one must work hard to remain stupid." ~Benjamin Franklin~
|
|
|
|
|
04-27-2017, 06:31 AM
|
#12 |

Join Date: Apr 2017
Location: Omaha, NE
Posts: 7,982
|
I am amazed at how many people are burning up drill bits doing these flanges. I machine and work with stainless steel (and other metals) on a daily basis. Three things to prevent these issues. 1. Use a cutting oil. Most hardware stores sell small bottles cheap. If you don't want to spend the money, then use a light oil of some kind. It reduces the friction on the head as it cuts, and allows it to cut easier while also cooling it. Be liberal with it! Oil is cheap compared to what coated bits cost. 2. Step up in size. Don't go for broke straight to half an inch. Find the size of the hole, go a little bigger, then again, and work up to that half inch bit. This reduces the friction on the cutting surfaces even more. It also allows the sharpest and most effective part of the bit to do the work - the outer edges. 3. Go slow. Drilling hard metals on our presses at work we usually set the press RPM to around 330-360rpm. Obviously, hand drills don't quite have that option, but a little trigger control goes a long way - patience is a virtue. Pull enough to get it spinning and cutting and just let the drill and the bit do the work. Again, this reduces unecessary friction, and as a result, heat. It's not the hardness of the metal that is killing the bits, but the heat generated by that friction, and if you heat that cutting edge up enough, it softens and deforms. Coated drill bits have a hard coating to help reduce deforming, but even the best bit can be destroyed by improper use. We had a new guy at work destroy a $140 end mill bit because his feed rate was too high.
Ok, sorry, rant and hijack over. Nice clean install. I hope when my bike gets delivered (waiting a month sucks) and parts in I can pull off a nice clean install like that. I would recommend maybe massaging that exhaust pipe a little with a few light ball peen hammer blows covered in cloth to give you a tiny bit of clearance instead of bending the clutch lever. A teeny ding in the pipe will have no measurable effect on performance (been researched and proven many times), and being at that angle it probably won't even be noticeable. I would rather do that than risk potentially weakening the clutch arm, by trying to bend it. Just my 2 cents, and take it as such. |
|
|
|
04-27-2017, 09:59 AM
|
#13 | |
|
Join Date: Feb 2016
Location: NY
Posts: 172
|
Quote:
Thank you for the kind words and advice, I am definitely a novice when it comes to machining type operations. I did apply some oil and went as slow as I could with the hand drill, but doing steps up in size definitely would have been a better choice in retrospect. Also the bits were just cheapo Lowes generic brand so that could have been a factor. When I cut it with the dremel I was getting a lot of flowering sparks so it must have been pretty high carbon steel. Also I like the idea of putting a dimple in the pipe instead of bending the lever, will definitely do that if it becomes an issue!
__________________
2005 CBR600RR
2016 CSC TT250 Coming Soon |
|
|
|
|
04-27-2017, 04:23 PM
|
#14 |
|
Join Date: Apr 2017
Location: Omaha, NE
Posts: 7,982
|
I have a set of titanium and carbide coated drill bits from Northern Tool (essentially no different than Harbor Freight) that I use at home. I have yet to replace one, and I only drill through metal with them. Glad to be of assistance where I can
|
|
|
|
04-27-2017, 04:56 PM
|
#15 |

Join Date: Mar 2010
Location: Volcano, Ca
Posts: 7,078
|
Less than 5 minutes with a Dremel is all that's required. Just whack out the ends of both ears. The pipe will also center that way. The stuff cuts real nice. No drills needed.
__________________
"Light a fire for a man, and you heat him for a day. Light a man on fire, and you heat him for the rest of his life." 2007 Suzuki DRZ400S (SM convert) 2009 Q Link XP 200 1967 BSA B25 250cc Starfire 2022 Royal Enfield Interceptor 650 2023 Royal Enfield Scram 411 1948 Royal Enfield Model G 350 |
|
|
|
|

|
 |
|
|


 Linear Mode

