 07-26-2014, 01:23 AM
|
#31 | |

Join Date: Jul 2008
Location: Idaho
Posts: 25,054
|
Quote:
 I'm glad to hear your TMEC200 is performing well in the excessive heat. 
__________________
Spud "Never argue with an idiot. He will drag you down to his level, and beat you with experience."  Mark Twain Mark Twain2015 Zongshen ZS250GY-3 (RX3) 2006 Zongshen ZS200GY-2 (Sierra 200) 2005 Honda XR650L 2004 Honda CRF250X 1998 Kawasaki KDX220 Mods made to my Zongshen ZS200GY-2: http://www.chinariders.net/showthread.php?t=6894 |
|

|
|
07-26-2014, 10:31 AM
|
#32 |
|
Join Date: Feb 2009
Location: Green Bay, WI
Posts: 82
|
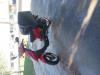
TMEC-200 Mod 12
Well I got a bug up my arse about fixing the side stand before I went riding today. I emulated the Japanese method. It seems odd to me that TMEC wouldnt just do it the correct way to start with. I took the cut off wheel and clipped the welds then pulled the upper pin out of the hole. I used a bolt that came from the crate packing and put it in the back side of the hole and welded it from the front and back. I then removed the lower pin off the front and put it in the same location but on the back of the side stand. After the modification I only needed the single larger spring. There will be a couple posts to show the before and after.
Here it is. |
|
|
|
07-26-2014, 10:32 AM
|
#33 |
|
Join Date: Feb 2009
Location: Green Bay, WI
Posts: 82
|
Moar!
|
|
|
|
07-26-2014, 11:02 AM
|
#34 | |
|
Join Date: Feb 2009
Location: Green Bay, WI
Posts: 82
|
Here are the KLR650 foot pegs I purchased.
http://www.ebay.com/itm/110924667768...84.m1439.l2649 Quote:
Last edited by mmprestine; 07-26-2014 at 11:36 AM. |
|
|
|
|
07-26-2014, 11:26 AM
|
#35 | |
|
Join Date: Feb 2009
Location: Green Bay, WI
Posts: 82
|
Here is how to modify the turn beeper.
Behind the front headlight fairing there will be a small plastic box. Inside is just a simple RC (resistor/capacitor) circuit to generate the flasher interval. To be able to get in there you have to remove the two 10mm bolts on the sides of the fairing and tilt it back. Some times pictures are worth a thousand words so take a look. Remember I have completely removed my piezo so it is not there. You can do the same or just put some scotch tape over the small hole in it to quiet it down if you choose to leave it. Also you can see how I black taped the hole to protect the circuit from moisture. Again multiple posts to show the pictures. Matt Quote:
|
|
|
|
|
07-26-2014, 11:28 AM
|
#36 |
|
Join Date: Feb 2009
Location: Green Bay, WI
Posts: 82
|
Continued.
|
|
|
|
07-26-2014, 12:51 PM
|
#37 |

Join Date: Mar 2009
Location: Sardis, BC, Canada
Posts: 25,977
|
Excellent! I'm going to try that today.
While I'm playing with the flasher, I'm going to see if I can convert to a regular flasher. If I can, I'll be able to use an LED flasher instead.
__________________
Weldangrind "I figure I'm well-prepared for coping with a bike that comes from the factory with unresolved issues and that rewards the self-reliant owner." - Buccaneer |
|
|
|
07-26-2014, 03:49 PM
|
#38 |
|
Join Date: Jun 2014
Location: Monroe, WI
Posts: 104
|
sweet!! i just put tape over my beeper and its much quieter! at least until i get used to turning it off. about to go look at my chain roller, ill have to order that one from rocky mtn atv. and definitely getting those foot pegs too!!
|
|
|
|
07-26-2014, 03:54 PM
|
#39 | |
|
Join Date: Jun 2014
Location: Monroe, WI
Posts: 104
|
Quote:
and i just put tape over the beeper for now, much quieter!! thanks for that tip!! ill be getting those fort pegs too, and should go look at my chain roller now while I'm thinking about it. this site is the best!! |
|
|
|
|
07-26-2014, 06:36 PM
|
#40 | |
Join Date: May 2006
Location: Yuma, Arizona
Posts: 9,035
|
Quote:
__________________
"They say that life's a carousel, spinning fast you got to ride it well..." TGB Delivery Scooter 150 TMEC 200 Enduro--carcass is sadly rotting in the backyard |
|
|
|
|
07-26-2014, 06:54 PM
|
#41 | |
|
Join Date: May 2006
Location: Yuma, Arizona
Posts: 9,035
|
Quote:
I definitely need something for my chain because my chain rubs the rubber guide due to my smaller rear sprocket. I am hoping that Wade will convince the TMEC factory to start using 46 tooth rear sprockets as I have suggested to him numerous times. But they would definitely need to figure out a fix for the chain guide if they do that (or if Wade finds a manufacturer to make a 46 tooth rear with this bolt pattern in steel as an aftermarket option). Speaking of rear sprockets, Rebel Gears of Tennessee (I think of Tenn, but they are on the internet) do have the TMEC bolt pattern when I had them make me a 40 tooth, but if you want to have them custom make you one, get at least a 44 in my opinion. But, keep in mind, they make them in an alloy since they are technically made for competition, and I went through a few chains on my commutes since the alloy ate them up (I did not realize people who compete in motocross and such will buy a chain just to use for a race or two, so that kind of made me realize that my sprocket had nothing necessarily wrong with it, as well as my chains, but the sprocket was not made for commuting like the stock 56 or the steel 48 I found in the UK via JT Sprockets (I guess you can order the 48 via JT's US affiliate, but it was easier and less cost to use an online parts retailer in the UK who carried them). http://www.urbanbike.co.uk/ http://www.rebelgears.com/
__________________
"They say that life's a carousel, spinning fast you got to ride it well..." TGB Delivery Scooter 150 TMEC 200 Enduro--carcass is sadly rotting in the backyard |
|
|
|
|
07-26-2014, 07:39 PM
|
#42 |
|
Join Date: Feb 2009
Location: Green Bay, WI
Posts: 82
|
Let it breathe
I know that some of these mods are to much for some but I will capture them anyway. Here I modded the exhaust to remove the catalatic honey comb to allow the exhaust to breathe more. Cut it, Dig it, Tig it!
Matt |
|
|
|
07-26-2014, 07:40 PM
|
#43 |
|
Join Date: Feb 2009
Location: Green Bay, WI
Posts: 82
|
Another!
|
|
|
|
07-26-2014, 07:41 PM
|
#44 |
|
Join Date: Feb 2009
Location: Green Bay, WI
Posts: 82
|
Getter done!
|
|
|
|
07-26-2014, 07:55 PM
|
#45 | |
|
Join Date: Feb 2009
Location: Green Bay, WI
Posts: 82
|
How much does Reble Gears charge for a custom made sprocket?
It seems unclear to me how the alloy would devour the chains. Was the actual pitch of the teeth correct? Perhaps the engagement was to deep for the type of chain roller that was used? These are all just questions. I have been looking around for some cheap plate sprockets that I can tailor to the bolt pattern of the TMEC. I have a small CNC at home that I could cut some customs but starting with the plate sprockets is very cheap and then I just need to mill the bolt pattern. I was also looking at Honda and Yamaha sprockets also but just haven't pursued it very hard. Quote:
|
|
|
|
|
|

|
 |
| Tags |
| 163fml, 200cc, tmec, tmec-200, tmec-200-1 |
|
|


 Linear Mode

