 01-15-2011, 12:58 PM
|
#91 |
|
Join Date: Jun 2006
Location: directly under the earths sun............NOW
Posts: 2,302
|
Thanks.
I'm very happy today. My wife came home from staying at her sisters and I fired it for a second and it scared her a little. I know I shouldnt use the starting fluid but I'm done with that now and will get it some good ole regular here ASAP. I have some running around to do today now so I have to wait until later to get anything else done but I'm over the hump on this one, now it's just clean it all up time. (unless the wiring smokes on me) |

|
|
01-17-2011, 06:17 PM
|
#92 |
|
Join Date: Jun 2006
Location: directly under the earths sun............NOW
Posts: 2,302
|
Well didnt get as much done as I wanted but it is closer.
The 300ex battery box is installed under the seat so now the rest of the electrical stuff can be mounted which is going to take some work but it just keeps getting easier and easier. With the exhaust pretty much done, well atleast good enough to run it a bit and it sounds good, starts and idles like it should. I just cant hardly wait to take it for its first ride around the yard because I'm curious as to how close I got the chain/sprockets set to the right ratio. This thing should be a blast with more conveniences than a regular blaster, electric start, left hand thumb choke, four stroke putt-putt engine :wink: |
|
|
|
01-17-2011, 06:19 PM
|
#93 |
|
Join Date: Aug 2010
Location: austin, tx
Posts: 1,452
|
good deal man, sounds like she will be a blast..
__________________
200cc beast replica,carsoli cdi,performance coil,fmf powercore 2,uni air filter,hour/tach meter,jetted mikuni carb,msr bars,moose racing grips,yz250f clutch perch,D.I.D chain |
|
|
|
01-17-2011, 08:52 PM
|
#94 |

Join Date: Mar 2009
Location: Sardis, BC, Canada
Posts: 25,977
|
I hope you get video of the maiden voyage.

__________________
Weldangrind "I figure I'm well-prepared for coping with a bike that comes from the factory with unresolved issues and that rewards the self-reliant owner." - Buccaneer |
|
|
|
01-19-2011, 06:23 AM
|
#95 |
|
Join Date: Jun 2006
Location: directly under the earths sun............NOW
Posts: 2,302
|
Still have lots to do but here it is as it stands this morning.
This is where the CDI, regulator and relay will be located.(I may shield them from tire fling a bit later) 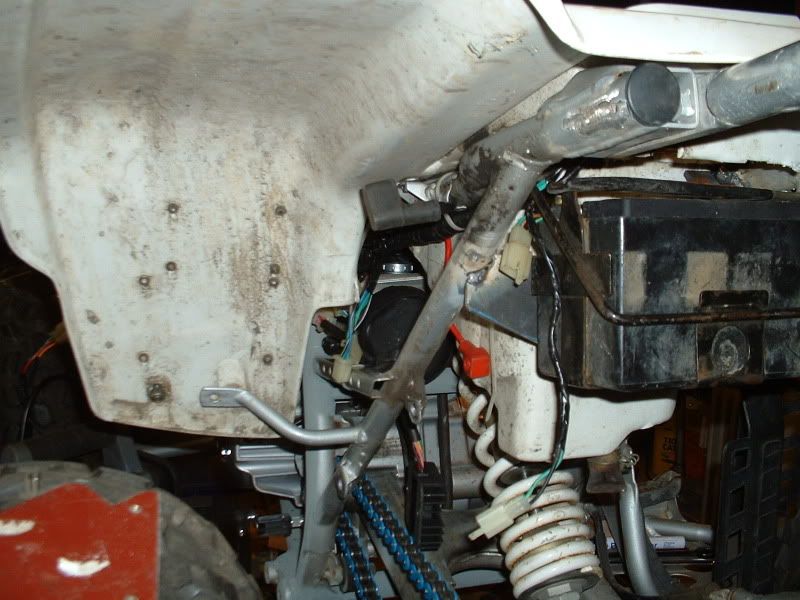 I cut the top mount and the tank just clears so I'll most likely shim it 1/4" just to give a little room over the valve cover. This is just the right side but the exhaust is on tucked neatly behind/under the plastic fender.(needs a little heat shield to protect leg) 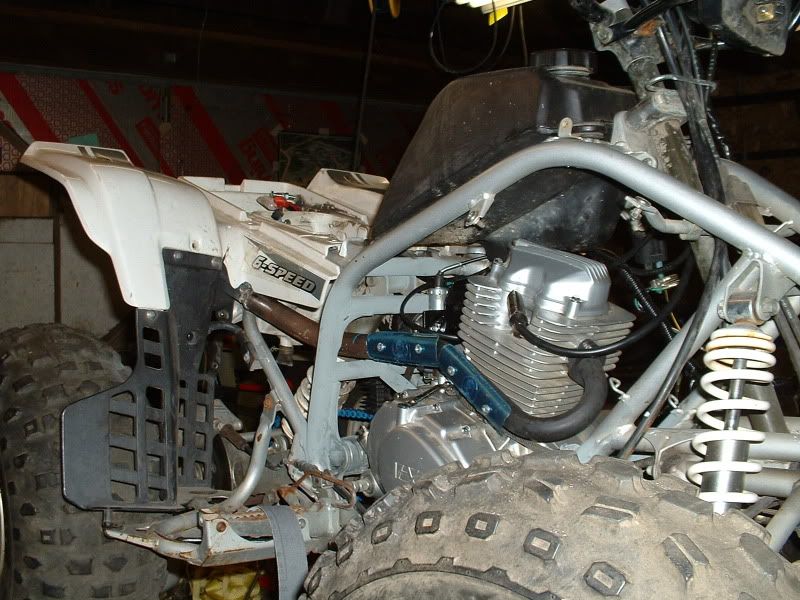 The 300ex battery box. 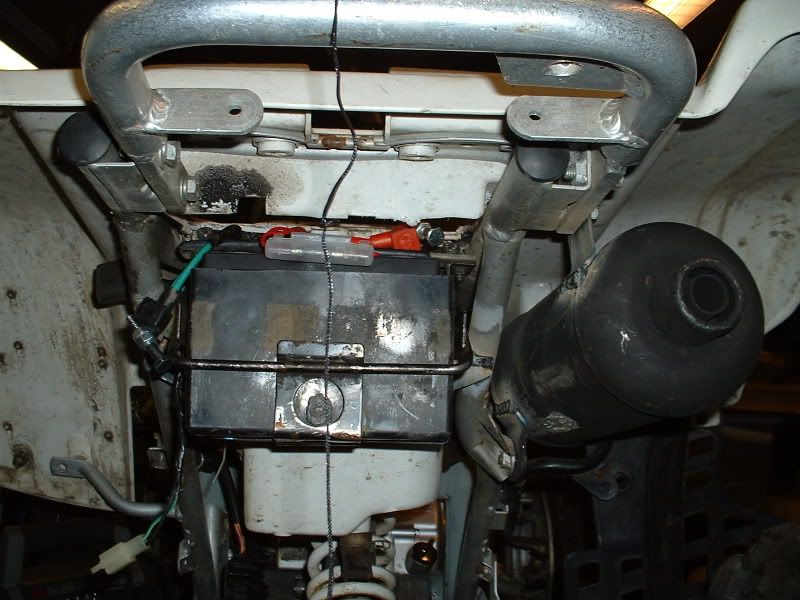 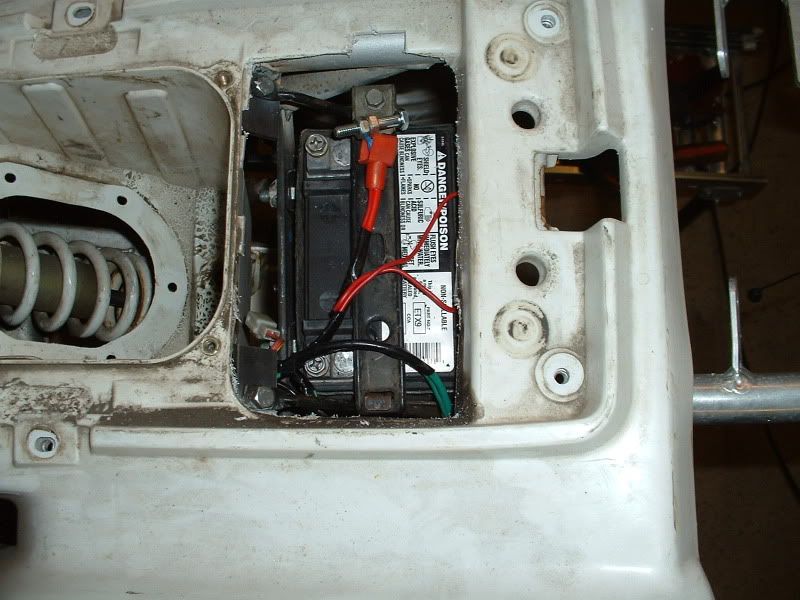 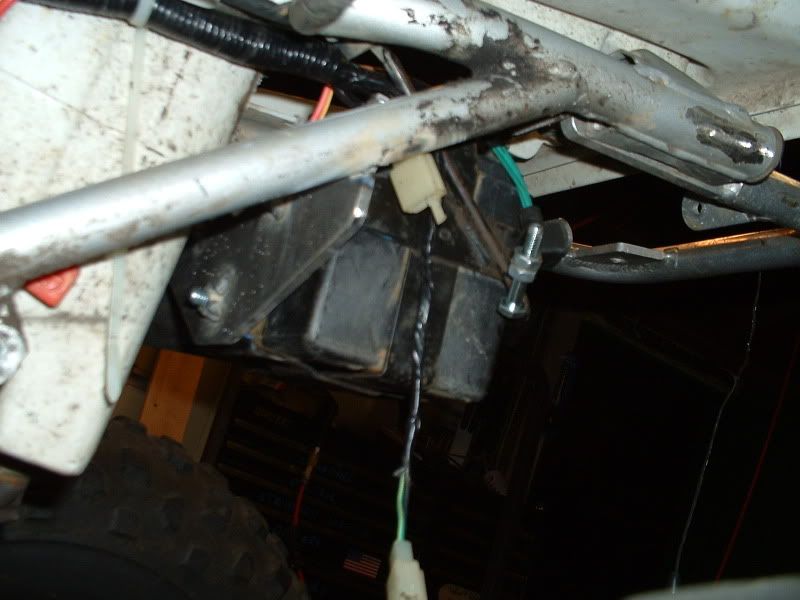 The wire mess but it doesnt scare me I have it beat.(still got work to do on it but I'm all over it) 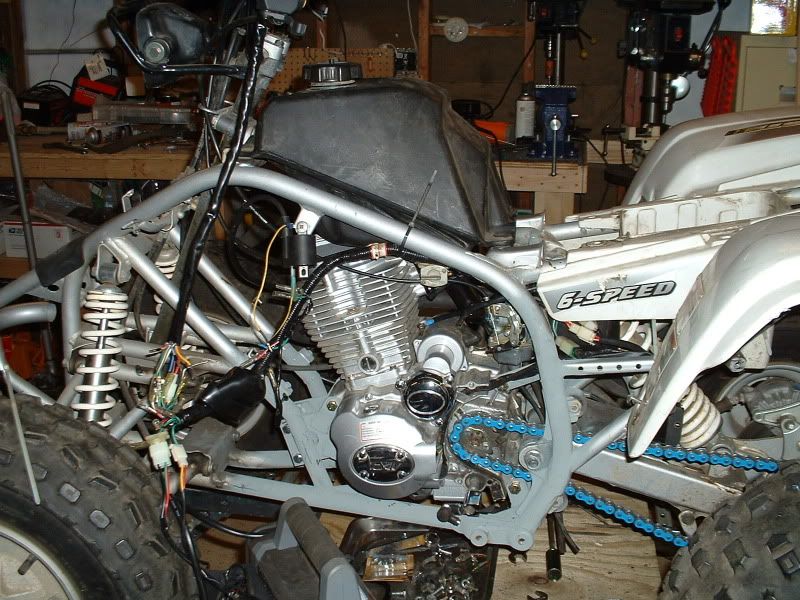
|
|
|
|
01-19-2011, 10:34 AM
|
#97 |
|
Join Date: Mar 2009
Location: Sardis, BC, Canada
Posts: 25,977
|
Can you apply some adhesive heat shield to the underside of the tank? It might be a good idea, considering the heat that is generated through the valve cover.
The upper steering support is obviously where the design came from that's on the Gio Beast. May we have a close-up shot of the bottom of the steering shaft? Your quad is coming along nicely. Only a few more hours!
__________________
Weldangrind "I figure I'm well-prepared for coping with a bike that comes from the factory with unresolved issues and that rewards the self-reliant owner." - Buccaneer |
|
|
|
01-19-2011, 12:20 PM
|
#98 |

Join Date: Mar 2009
Location: Southeastern Washington desert
Posts: 14,761
|
Great work. I am impressed and bet you will have a lot of fun with the finished project. Looks like you're almost there.
The trick to the wiring nightmare is to look at it as many small projects rather than one big one. The make each connection 100% secure. Soldering and shrink tubing is the way I like to do it. Then pray, and turn the key.
__________________
Happy to serve. |
|
|
|
01-19-2011, 03:51 PM
|
#99 |
|
Join Date: Jun 2006
Location: directly under the earths sun............NOW
Posts: 2,302
|
Thanks for the comments.
I am excited about how close it is but wont be able to work on it until the weekend.My garage just takes to much to heat up so I like to make a full day of it when I'm out there. The wiring was harder than it should have been but easier than I thought it would be.I may order a terminal kit from vintage connections.I wanted to before but never got around to it then we moved but I could make use of them. yeah some sort of heat shield will most likely be needed although the stock blaster engine was also right under it but better safe than engulfed in flames. It is close to rideable but even after that there is a lot to do to it but it will all come around soon. I think I'll go ahead and order the rear brake cable and a taillight for it. I have to look around and see if I have all the plastic, for some reason I think I'm missing the front hood. Pics of the lower steering stem. 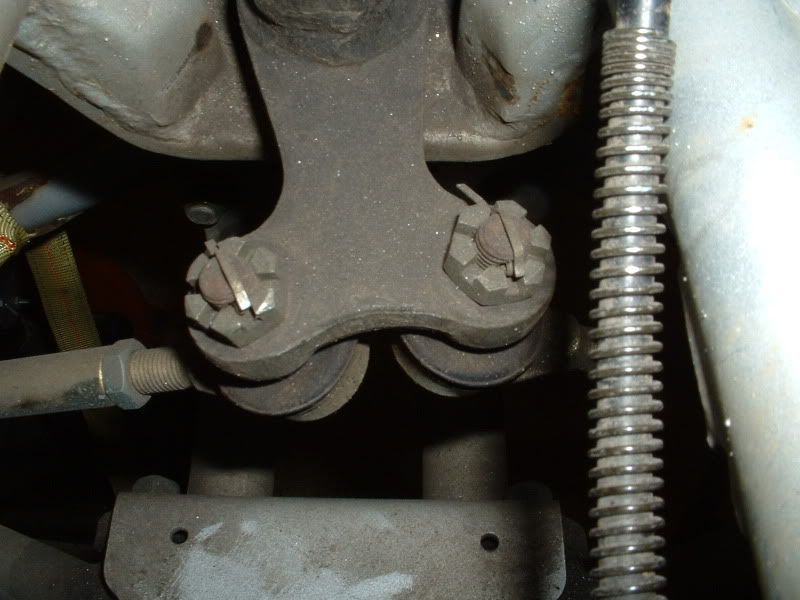 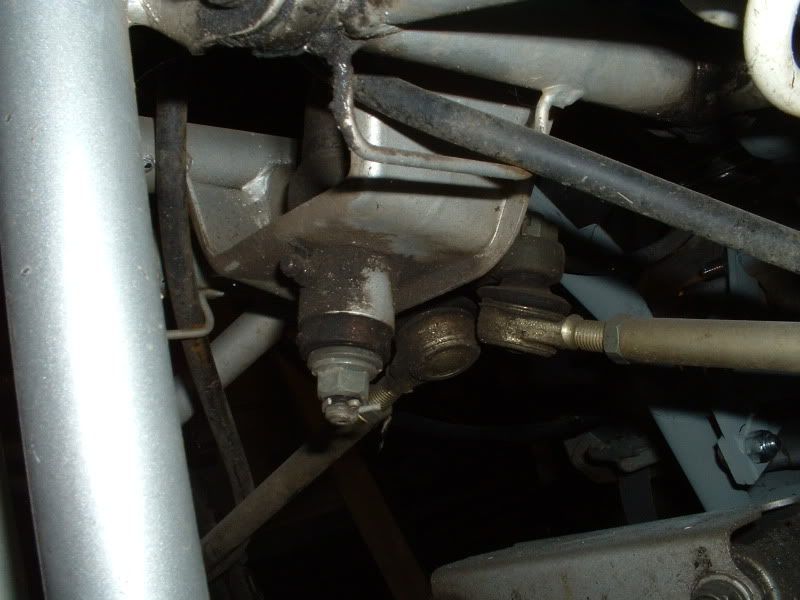 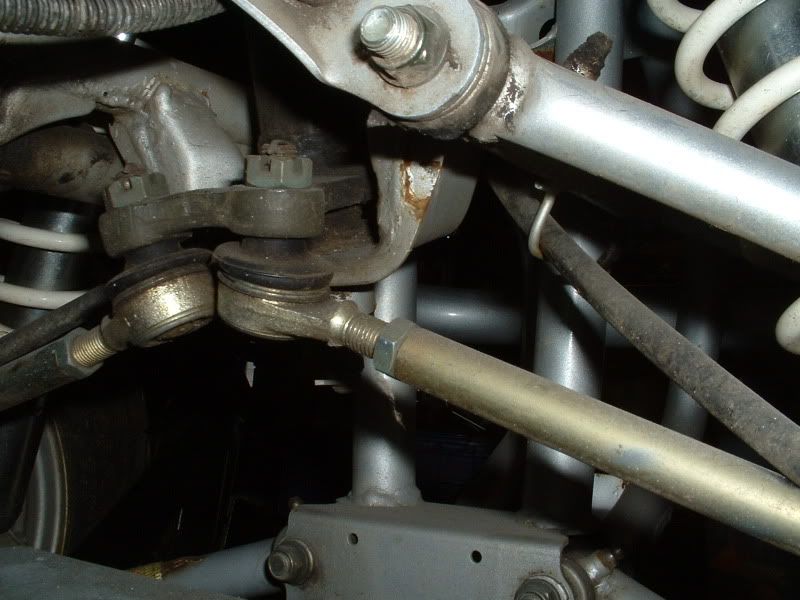 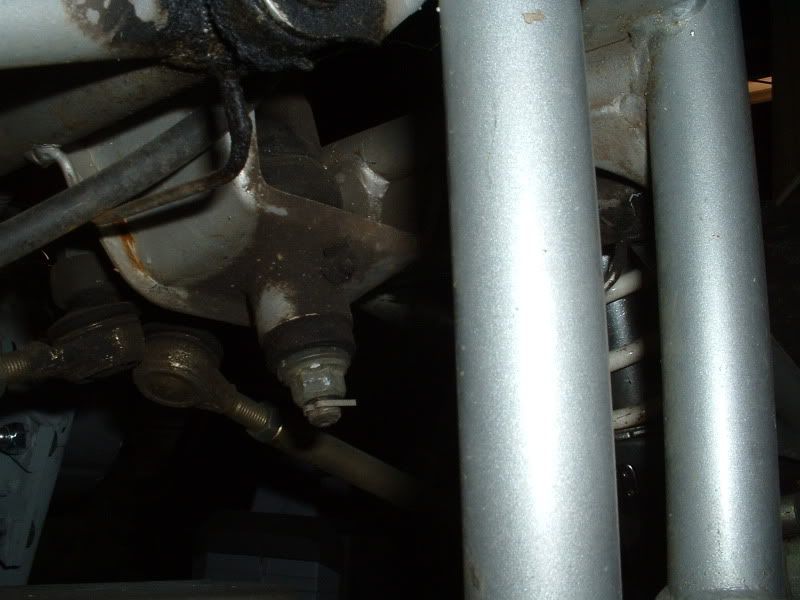 I dont know if I got the shot you wanted let me know. |
|
|
|
01-19-2011, 08:21 PM
|
#101 |
|
Join Date: Mar 2009
Location: Sardis, BC, Canada
Posts: 25,977
|
Thanks for the great shots! It's amazing, that's exactly how my Beast is set up. I knew that there were some similarities, but not this close.
Is that a rubber washer / isolator above the castle nut? If so, that would explain why the hole was drilled so far down on our quads. I stacked stainless washers to take up the space so that the castle nut would line up with the cotter pin. If that is a rubber piece, I might order one to see if it removes some steering vibration. What year and model is your quad?
__________________
Weldangrind "I figure I'm well-prepared for coping with a bike that comes from the factory with unresolved issues and that rewards the self-reliant owner." - Buccaneer |
|
|
|
01-20-2011, 01:38 AM
|
#103 |
|
Join Date: Jun 2006
Location: directly under the earths sun............NOW
Posts: 2,302
|
I cant off hand remember what year this blaster is, maybe an early 90's, they are all pretty much the same up until around 03.
The grease zerks are nice and found all over the yamaha's which I like, as you can see this thing needs to be cleaned up. :oops: If it wasnt 1:30 A.M. I'd go out and take a poke at the bushing just above the castle nut but I'll check it out thursday for you.(I doubt its rubber) The blaster is a good, simple, solid ATV that has a proven design and would be safe to copy which is what it looks like the chinese did to a certain extent.The chinese are not stupid, I havnt seen them make a copy of the yugo  . .Here is a exploded view of the frame showing a bushing for that. 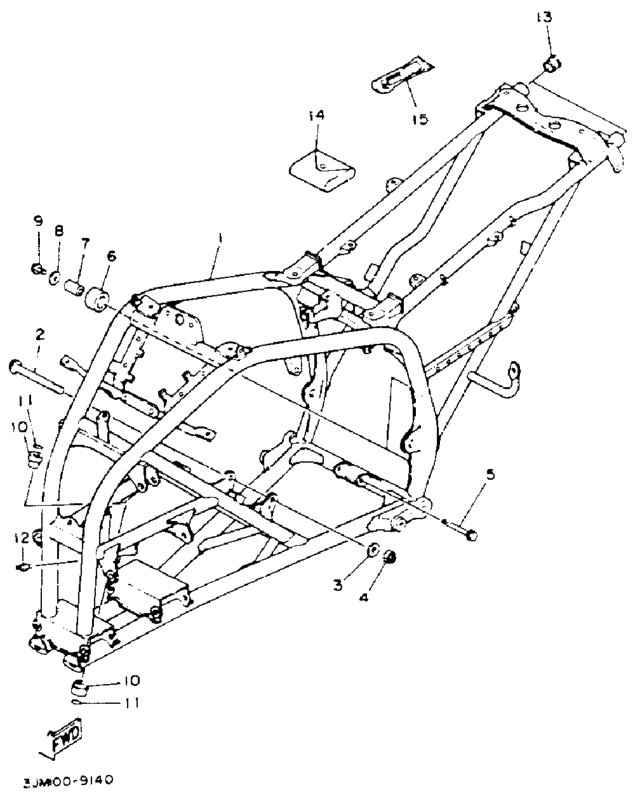 The steering stem. 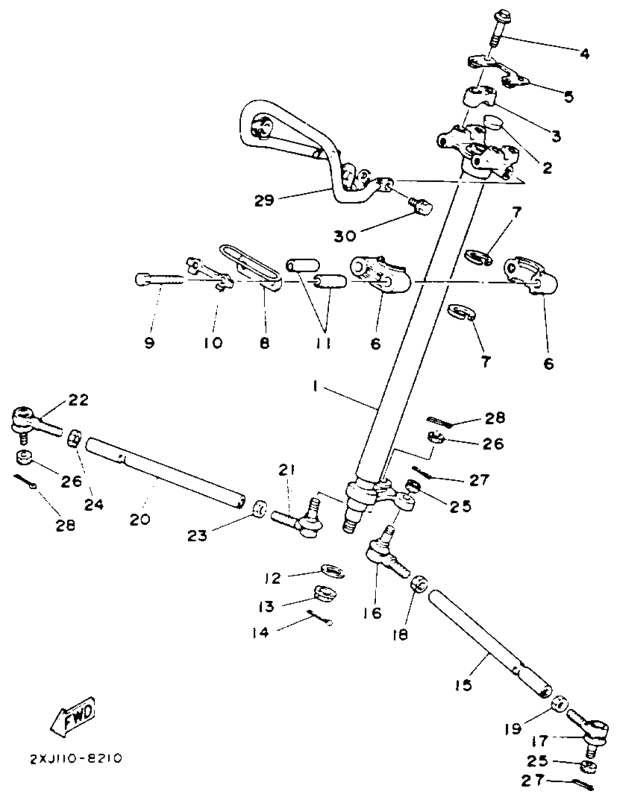 I did order two connector kits to complete the wiring and have it look professional as well as the rear brake cable that is broke and an led tail light for it. The brakes still work but an adjuster is broke and it wont last long with use. |
|
|
|
01-20-2011, 02:14 AM
|
#104 |
|
Join Date: Mar 2009
Location: Sardis, BC, Canada
Posts: 25,977
|
Thanks for the expoded views. The steering shaft, the clamshell bearing halves with o-rings, the tie rods, everything looks the same. Good to know there's another source for parts.
__________________
Weldangrind "I figure I'm well-prepared for coping with a bike that comes from the factory with unresolved issues and that rewards the self-reliant owner." - Buccaneer |
|
|
|
01-20-2011, 06:47 AM
|
#105 | |
|
Join Date: Jun 2006
Location: directly under the earths sun............NOW
Posts: 2,302
|
Quote:
Posting those are easy since most every online yamaha dealer has the online microfiche. |
|
|
|
|
|

|
 |
|
|


 Linear Mode

