 07-24-2017, 09:00 PM
|
#1 |
|
Join Date: Jan 2017
Posts: 43
|
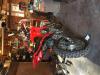
Hawk Seat Rebuild
After lowering the Hawk it was the time to take care about the seat. I don't know who designs seats like this? Do they have anything between theirs legs, or it is designed by women for women? I think about that on every bump on the road when hitting the tank with my balls.
So, there were two options, either remove the bulge or fill up the cavity. I decided to remove the bulge first, and check. Here are the steps: Before:   The foam is taken out.  The foam to be removed.  Coarse fiber sanding disc used for shaping and cutting the foam.  Smoothing the surface with sandpaper.  Vinyl is back.  And after  Once done, I found modified seat pretty comfortable to my taste. What a difference! Note: It is not shown on the picture, but I strongly suggest to add the polyester batting under the vinyl, as in the following example. For those, who want to reconstruct the seat by adding more foam, here is experience with my Versys-X 300. Before:  Stock vinyl removed  Reshaped two layers of 2 inches foam ordered here: http://www.foamforyou.com/Open_Cell_Foam.htm  Topped with polyester batting from Hobby Lobby.  My wife added these. Made from marine grade vinyl, also from Hobby Lobby.  And the final view. Now I am in heaven!  Please also check my another mods: http://www.chinariders.net/showpost.php?p=241532&postcount=1 http://www.chinariders.net/showpost.php?p=241533&postcount=2 http://www.chinariders.net/showpost.php?p=242310&postcount=8 http://www.chinariders.net/showpost.php?p=243629&postcount=10 http://www.chinariders.net/showpost.php?p=247652&postcount=13 http://www.chinariders.net/showpost.php?p=248489&postcount=4 |

|
|
07-24-2017, 10:21 PM
|
#2 |
|
Join Date: May 2017
Posts: 35
|
Great post Green Hawk
That is exactly the info I needed to get rid of that annoying rear half of my Hawk seat. Thanks! |
|
|
|
07-25-2017, 12:07 AM
|
#3 |

Join Date: Feb 2016
Location: George West, Texas
Posts: 4,097
|
That K aw seat is pretty hard when I checked it out at the dealer. Ok for shorts, but can see where it would be tough for an extended jaunt.
Taking China rider principles and applying to jap bikes. Your supposed to order the high dollar replacement seat said the gate keeper. 
__________________
***************************************** 2015 Bashan"Blaze" BS250GY-31 (DB-07K-250) GONE 2017 Suzuki V Strom 650 XT "We are all born ignorant, but one must work hard to remain stupid." ~Benjamin Franklin~
|
|
|
|
07-25-2017, 12:43 AM
|
#4 |

Join Date: Apr 2017
Location: Omaha, NE
Posts: 7,909
|
Hell, compared to my GL, my hawk is like sitting on a sofa suspended by clouds. I do wish the foam was a lot firmer thpugh. After an hour on the thing my rear end is sore.
__________________
2018 Hawk 250 - Full Mod list here. http://www.chinariders.net/showpost....62&postcount=1 Hawk Information and Resource guide: http://www.chinariders.net/showthread.php?t=20331 2010 VFR1200F - http://chinariders.net/showthread.php?t=20708 |
|
|
|
07-25-2017, 03:25 PM
|
#7 | |
Join Date: May 2016
Posts: 237
|
Quote:
Short staples and a staple gun, rust proof staples would be a wise choice as regular staples will eventually rust. long staples will wind up poking you in the inseam. I forget the proper length but i have a box left over from snowmobile seats. |
|
|
|
|
07-25-2017, 04:04 PM
|
#8 |
|
Moderator

Join Date: Oct 2016
Location: Houma, La.
Posts: 11,533
|
Nice job. I would like to do something similar. Like move the notch about 2-3" farther back. I fill like I'm sitting on the tank.
__________________
2023 Lifan Lycan 250 Chopper 2023 Venom Evader 2022 Lifan KPX250 2020 Kawasaki Vulcan S 2004 Honda ST 1300 2016 Black Hawk 250 (sold) Keihin PE30 carb,125 main,38 slow.Pod filter,ported & decked head 10:1 CR,Direct Ignition Coil,15/40Sprockets,NGK DPR8EIX-9,De-Cat,Dual Oil Cooler,Digital Cluster 2016 Cazador180 XL 2014 Coolster150 JerryHawk250.com My YouTube Channel |
|
|
|
07-25-2017, 10:05 PM
|
#9 | |
|
Join Date: Jan 2017
Posts: 43
|
Quote:
 2. Use minimal possible air pressure or the staple would punch a hole in the vinyl. I used 65 PSI. |
|
|
|
|
07-26-2017, 09:59 AM
|
#10 | |
|
Join Date: May 2016
Posts: 237
|
Quote:
|
|
|
|
|
|

|
 |
|
|


 Linear Mode

