 06-03-2023, 09:05 PM
|
#1396 | |

Join Date: Nov 2022
Location: Pennsyltuckey
Posts: 311
|
Quote:
__________________
22 Templar 250 |
|

|
|
06-03-2023, 09:21 PM
|
#1397 | |

Join Date: May 2022
Location: Upstate NY
Posts: 91
|
Quote:
__________________
Zooker 2022 Hawk 250 - Mikuni clone carb, jetted appropriately. Pro Tork CRF 150 pipe. Nibbi pod filter. Tusk Chub bars with riser adapters. Amazon levers and foot pegs. Typical gearing change for street... Acerbis hand guards. Nibbi grips. Shortened rear fender. No graphics 2022 Templar X - Stock carb rejetted appropriately, Nibbi grips, Amazon hand guards. Amazon seat cover. Acerbis skid plate, heavily modded. Shortened rear "fender". Custom graphic kit. |
|
|
|
|
06-03-2023, 09:40 PM
|
#1398 | |

Join Date: Nov 2022
Location: Dallas TX
Posts: 626
|
Quote:
Congratulations, welcome to the club.  I don't ride serious track riding out the desert or anywhere to need rimlocks. My off road is rural roads with horrible maintenance, dirt roads and gravel roads. That's why I also changed my sprocket to taller gearing. I run no rimlocks, the Japanese rimlock hole plugs mentioned above earlier and fully balanced front and rear wheels. Even with the full knobbies I have never experienced any of the vibrations people have been sharing. When I convert to Shinko 705's or similar 80/20 street/offroad tires I am sure the difference will be even more smooth than it is right now. Every RPM, Every speed from 1 to 76 mph has been smooth with less wear and tear on the bike. Edit: I also run my valve stem nuts halfway up the stem to butt against the plastic valve stem screw on covers and help lock them in place. That's all the valve stem free movement I need to help prevent any stress or tear outs.
__________________
2022 1/2 Templar X 250 - 6 gear model - 13 Front / 40 Rear Sprockets - #42 / #120 Jets - 1mm thick nitrile O-ring needle shim (removed) - Kenda K761 Dual Sport Tires - Sedona Standard Thickness Inner Tubes - Stock OEM battery, carburetor, spark plug still going strong - https://youtu.be/dhAYEKH-jFQ |
|
|
|
|
06-08-2023, 08:02 PM
|
#1401 |

Join Date: Sep 2022
Location: Minnesota
Posts: 21
|
To those that installed full wrap handguards; did you have to drill out the handlebar ends to fit the bolt into it? Bought a set of universal handguards but the bolt and lock nut don't fit into the handlebar.
__________________
2022 Templar M 250 28 mm KIMISS carburetor 125 main 42 pilot Needle clip at center DID x-ring chain JTR897 45 tooth rear sprocket |
|
|
|
06-09-2023, 12:07 AM
|
#1402 |
|
Join Date: Nov 2022
Location: Pennsyltuckey
Posts: 311
|
No, you should never have to do that.
__________________
22 Templar 250 |
|
|
|
06-09-2023, 01:34 PM
|
#1403 |
|
Join Date: Oct 2020
Location: Central VA
Posts: 1,305
|
Ugh.. went to start the bike and nothing, found the fuse blown and swapped in the spare and instantly blew.. now im chasing down an electrical issue.. so far i dont see anything out of the ordinary. Will be buying a pack of fuses as well as an inline circuit breaker as ive already used up spare i had laying around. It will ofcourse light up with the fuse wires connected but then starts getting hot and smoking :(
__________________
2024 Templar 250 2021 Beta 500 RRS 2018 VStrom 1000 XT Former China Bikes: Tao DBX1, Brozz 250, CSC RX4, Titan DLX, Templar X, Storm DLX 150 |
|
|
|
06-09-2023, 08:42 PM
|
#1404 | |
|
Join Date: Sep 2022
Location: Minnesota
Posts: 21
|
Quote:
__________________
2022 Templar M 250 28 mm KIMISS carburetor 125 main 42 pilot Needle clip at center DID x-ring chain JTR897 45 tooth rear sprocket |
|
|
|
|
06-09-2023, 09:33 PM
|
#1405 | |
|
Join Date: Sep 2022
Location: Minnesota
Posts: 21
|
Quote:
__________________
2022 Templar M 250 28 mm KIMISS carburetor 125 main 42 pilot Needle clip at center DID x-ring chain JTR897 45 tooth rear sprocket |
|
|
|
|
06-10-2023, 12:24 AM
|
#1406 |
|
Join Date: Nov 2022
Location: Pennsyltuckey
Posts: 311
|
When I installed mine I found it worked better to pre tighten the expanding nuts until they were a snug fit in the bar end before tapping them in.
__________________
22 Templar 250 |
|
|
|
06-10-2023, 06:23 AM
|
#1407 | |

Join Date: Feb 2021
Location: Kansas City
Posts: 2,971
|
Quote:
__________________
No matter where you go, there you are... "It's the environment, stupid" ("No planet, no jobs" ) |
|
|
|
|
06-10-2023, 11:07 AM
|
#1408 | |

Join Date: Feb 2023
Location: Upstate SC
Posts: 418
|
Quote:
|
|
|
|
|
06-10-2023, 11:30 PM
|
#1409 |
|
Join Date: Feb 2023
Location: Upstate SC
Posts: 418
|
You guys helped me order a good replacement headlight so now I can see at night.
But...even though I'm kind of against adding a bunch of bolt-on BS, I had the urge to add a couple of driving lights. Because they had be had cheap and... I don't know. So they came in a couple of weeks ago. I bolted them on using their little brackets and the bolts on the side of the headlight surround. I feel like for actual trail duty I need to fabricate an actual mounting bar. But in the meantime and on road I think they will be OK.I had the urge to simply tie them into the headlight but resisted. Ordered a nice-seeming handlebar switch. It came in last week. Stole some time this morning and wired them up. Again tempted to make my life simpler with the wiring and again resisted. I went ahead and dug up a Bosch relay and wired them more correctly. They came with just clipped wires. To make them removable I used crimp bullet style connectors on them. A little slack in the wire in case I needed it for later repositioning to a light bar. Relay behind the headlight. I didn't even realize I had ordered a lit switch until I saw it had three wires instead of two. So I wired that up correctly too. Seem alright to me and don't look too out of place. 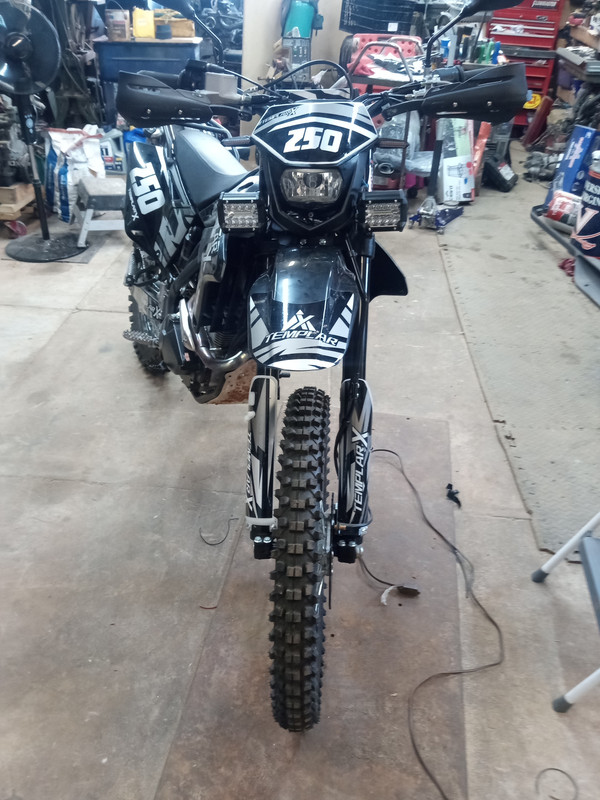 Aiming is currently just to either side of the headlight beam. Shown with headlight off. My one cheat with the wiring was that I did not wire through the ignition switch. I can turn them on without having the key in it. 
|
|
|
|
06-12-2023, 12:49 PM
|
#1410 |
|
Join Date: Oct 2020
Location: Central VA
Posts: 1,305
|
Yay! Figured out the short.. Was the wire bundle under the rear fender. I had originally electric taped around the existing rubber sheath that enclosed all of the butt connectors and when i was investigating the wrapped bundle looked fine until i decided to remove the electric tape and inspect and thats when i found the burned mess.. I separated all of the touching wires and connected the fuse ends and it lights up the dash and no smoke or hot wires anymore, previously the wires would get hot immediately.. have some 10amp fuses on order but im confident ive resolved the issue and will disconnect and fix all of the connections individually and wrap them. I also took this time to wrap and butt connectors on the bike that could pose a problem later on as well as re-route the throttle cable while the tank was off.. happy times! This should serve as a PSA for anyone else that runs into this issue, to look there first and ensure its connected properly and with no risk of burning together later on...
__________________
2024 Templar 250 2021 Beta 500 RRS 2018 VStrom 1000 XT Former China Bikes: Tao DBX1, Brozz 250, CSC RX4, Titan DLX, Templar X, Storm DLX 150 |
|
|
|
|

|
 |
| Thread Tools | Search this Thread |
| Display Modes | |
|
|


 Linear Mode

